> ## Documentation Index
> Fetch the complete documentation index at: https://docs.mindosoftware.com/llms.txt
> Use this file to discover all available pages before exploring further.
# Web chat widget
> Embed the MINDO chat on your website: snippet, signed identity for logged-in users (JWT) and customization.
## What it is
The web chat widget is **just another channel** in MINDO (like WhatsApp, Instagram
or ManyChat): a chat bubble you embed on your site with a `
```
You'll also see an **HMAC Secret** — you only need it if you're going to identify
logged-in visitors (Step 4). Keep it somewhere safe; it must never be exposed in
your site's HTML.
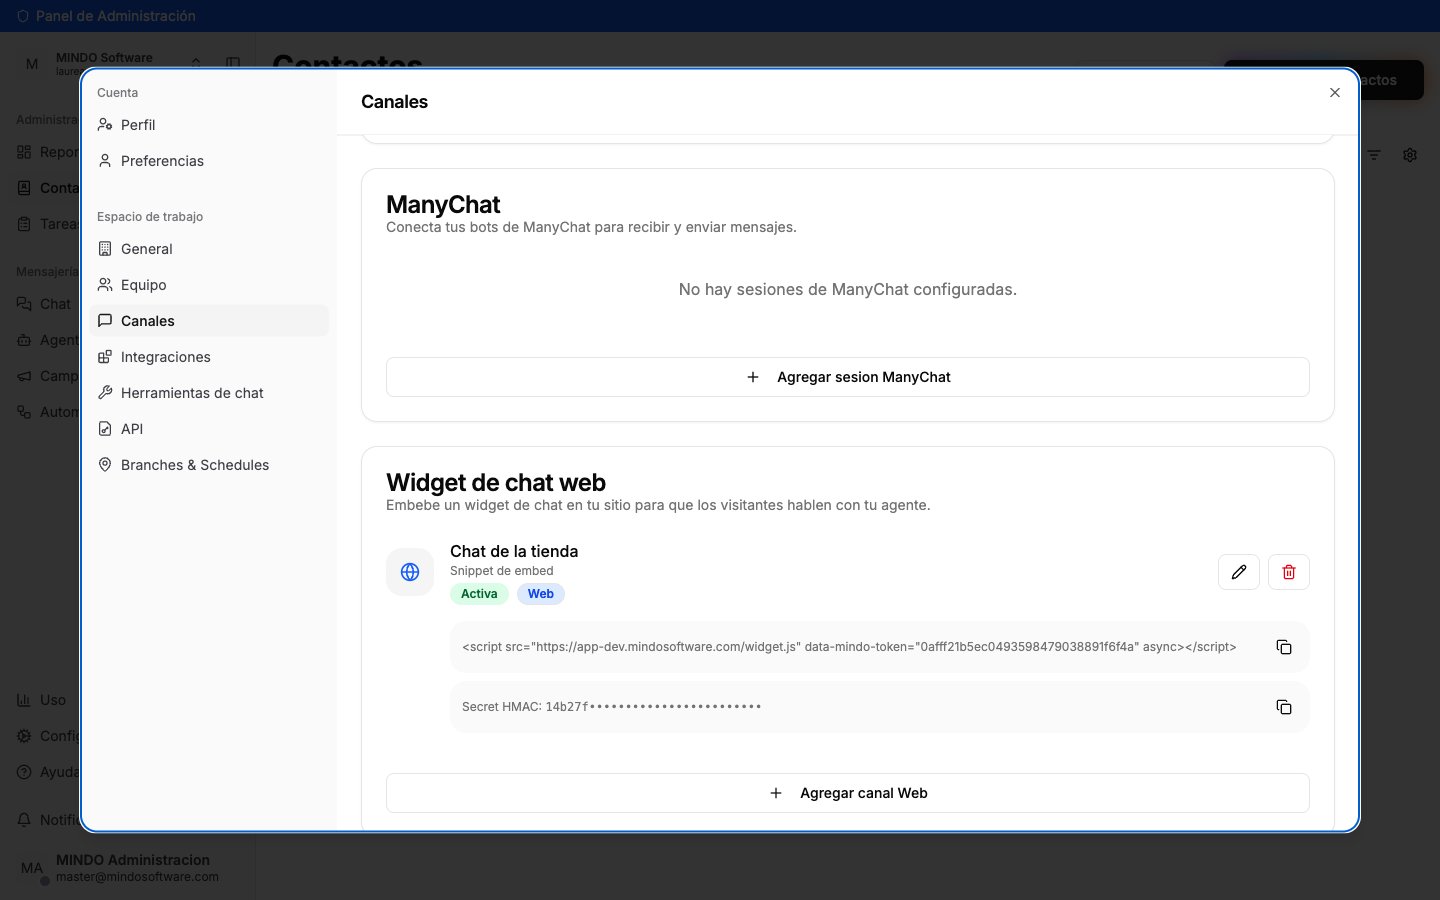 The snippet's **token** is public: it travels in your site's HTML and it's expected
to be visible. The **Secret** isn't: it's shown masked and only users with the
**ADMIN** role of the company can see it (for a MEMBER or VIEWER the API returns the
field empty).
Paste the `
```
The **HMAC Secret** is a server-side secret. Never include it in HTML, client-side
JavaScript, or a public repository — it should only exist in your backend, the
same way you'd store any other API key.
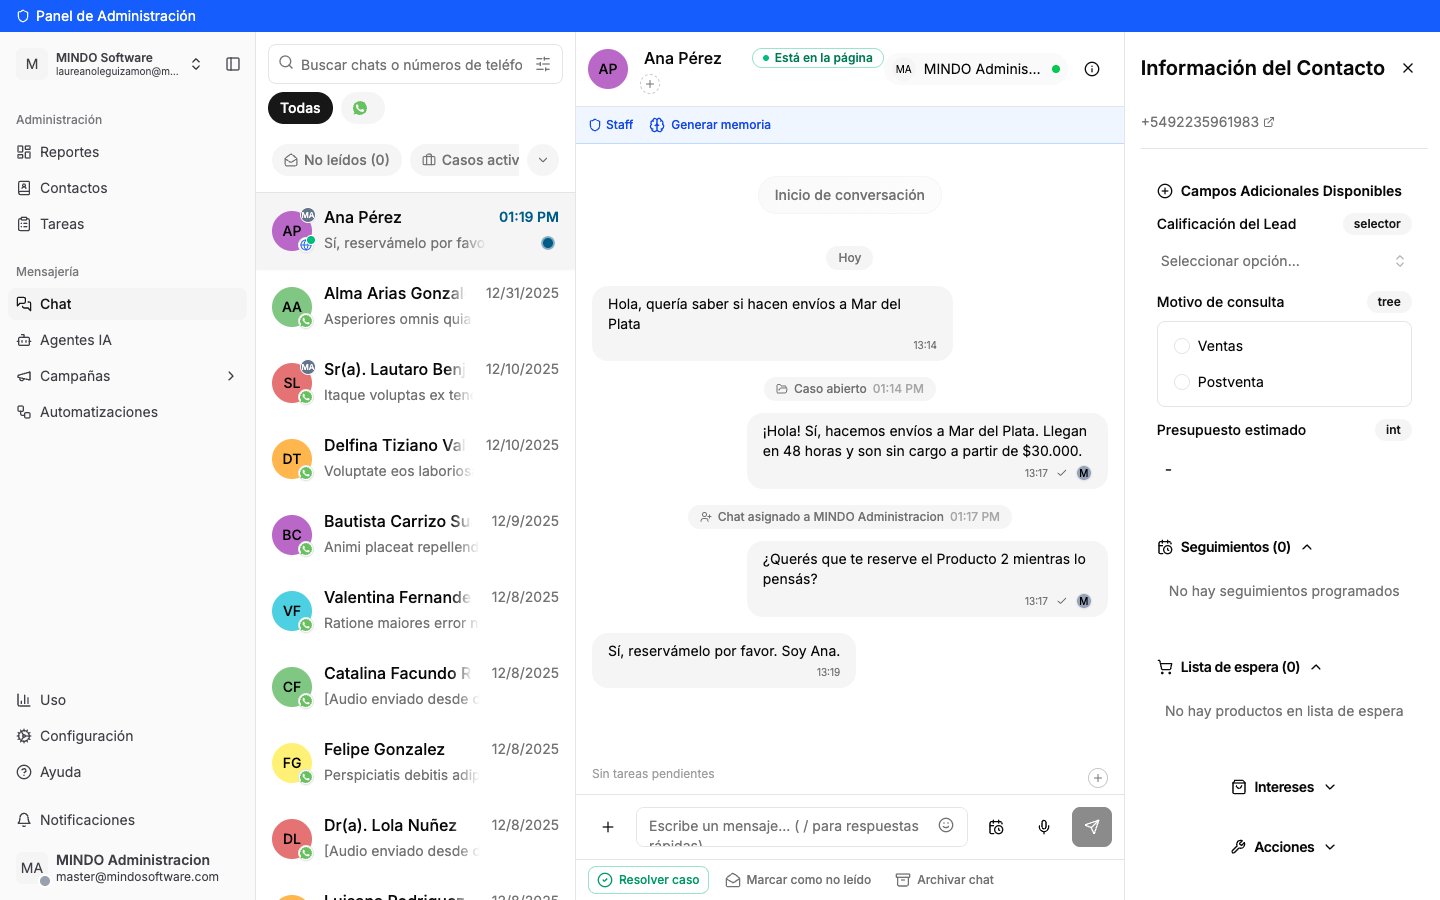
With the identity signed, the chat stops showing "Visitor ####" and becomes the real
person, with their phone and email already filled in on the contact record:
The snippet's **token** is public: it travels in your site's HTML and it's expected
to be visible. The **Secret** isn't: it's shown masked and only users with the
**ADMIN** role of the company can see it (for a MEMBER or VIEWER the API returns the
field empty).
Paste the `
```
The **HMAC Secret** is a server-side secret. Never include it in HTML, client-side
JavaScript, or a public repository — it should only exist in your backend, the
same way you'd store any other API key.
With the identity signed, the chat stops showing "Visitor ####" and becomes the real
person, with their phone and email already filled in on the contact record:
 The signature is **optional by design**: if it's missing, expired or invalid, the
visitor simply stays anonymous — the chat is never blocked by a signature error.
That means you can test without risking a broken widget.
The flip side is that a malformed JWT **fails silently**. If the contact still
shows up as "Visitor ####", check in this order: that the secret belongs to the
**same channel** as the token, that `exp` is in **seconds** (not milliseconds) and
less than 7 days away, that the claim is named `sub`, and that the algorithm is
**HS256**.
Before the JWT, identity was passed with three separate attributes. **It still
works and you don't need to migrate**: if you set both schemes at once, the JWT
wins, and if the JWT is broken it falls back to this one.
| Attribute | What it is |
| ---------------------- | ----------------------------------------------------------- |
| `data-mindo-user` | Your user's unique identifier (`userId`). |
| `data-mindo-expires` | Unix timestamp (seconds) until when the signature is valid. |
| `data-mindo-signature` | `HMAC_SHA256(secret, "{userId}:{expires}")` in hexadecimal. |
```javascript Node.js theme={null}
const crypto = require("crypto");
function signVisitor(userId, channelSecret, ttlSeconds = 60 * 60 * 24) {
const expires = Math.floor(Date.now() / 1000) + ttlSeconds;
const signature = crypto
.createHmac("sha256", channelSecret)
.update(`${userId}:${expires}`)
.digest("hex");
return { userId, expires, signature };
}
```
```python Python theme={null}
import hmac
import hashlib
import time
def sign_visitor(user_id, channel_secret, ttl_seconds=60 * 60 * 24):
expires = int(time.time()) + ttl_seconds
message = f"{user_id}:{expires}".encode("utf-8")
signature = hmac.new(
channel_secret.encode("utf-8"), message, hashlib.sha256
).hexdigest()
return {"userId": user_id, "expires": expires, "signature": signature}
```
```html theme={null}
```
**Why the JWT is the better choice if you're starting now**: this scheme signs
the string `userId:expires` using `:` as a separator, so it can't carry a name
or an email without becoming ambiguous. The JWT signs the exact data and lets
you send `name`, `email` and `phone` — which is what gives the contact a real
name and merges it with their WhatsApp chat.
If your site is an SPA, or the visitor opens the chat **before** logging in, there's
no need to reload the page for MINDO to recognize them. The widget exposes a
`window.Mindo` object:
```javascript theme={null}
// After your user logs in, with the JWT your backend signed:
window.Mindo.setUser(identityToken);
// On logout:
window.Mindo.clearUser();
```
The script loads with `async`, so `window.Mindo` may not exist yet when your code
runs. That's what the command queue is for: queue the calls and the widget processes
them once it finishes loading.
```javascript theme={null}
window.Mindo = window.Mindo || { q: [] };
(window.Mindo.q = window.Mindo.q || []).push(["setUser", identityToken]);
```
You can also do it **without writing any integration code**: if your page stores the
JWT in `localStorage` under the key `mindo_identity`, the widget picks it up on its
own. This covers logging in from a new tab or through an OAuth redirect, because the
widget listens for changes to that key. The same value can be broadcast over a
`BroadcastChannel` named `mindo-identity`.
Besides `setUser` and `clearUser`, `window.Mindo` exposes `open()`, `close()` and
`toggle()` to control the panel from your own UI (for example, a "Need help?"
button), and `on(event, callback)` / `off(event, callback)` to listen for `open`,
`close`, `unread`, `identity`, `identity:cleared`, `auth:login` and
`auth:register`.
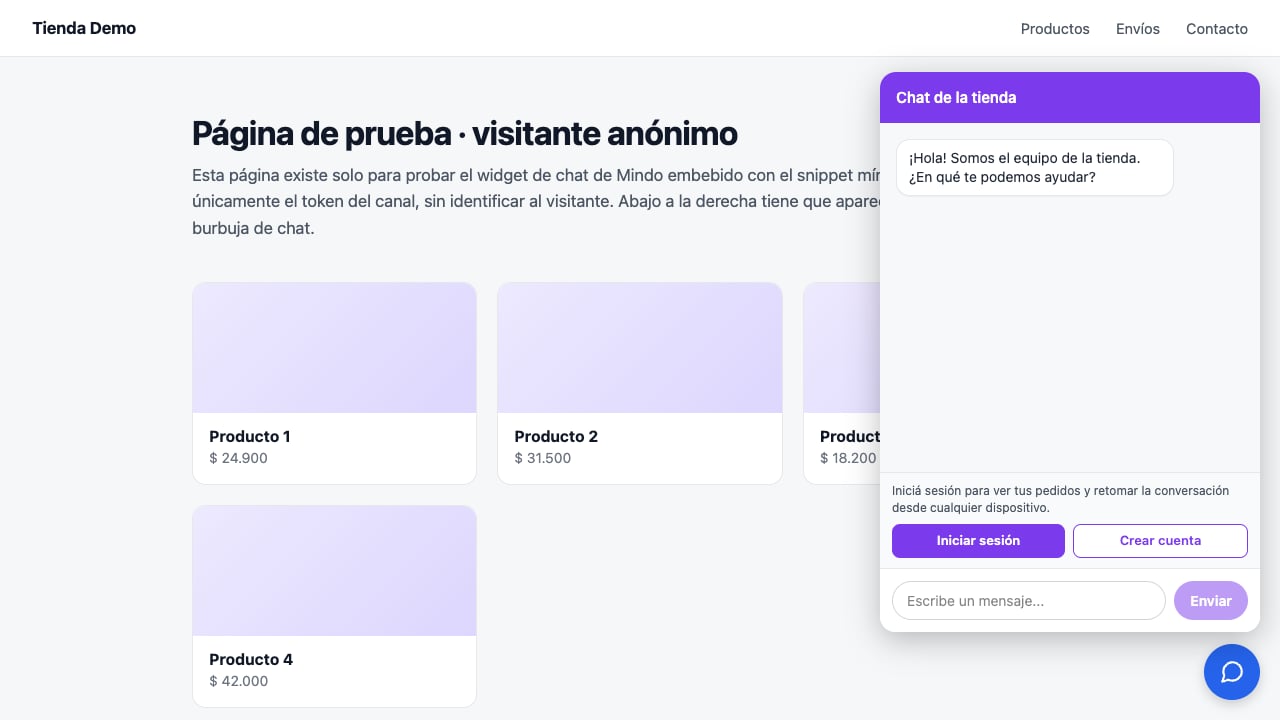
The widget can show the **anonymous** visitor a block with **Log in** and **Sign up**
buttons pointing to your site's pages. It disappears on its own once the visitor is
identified.
The signature is **optional by design**: if it's missing, expired or invalid, the
visitor simply stays anonymous — the chat is never blocked by a signature error.
That means you can test without risking a broken widget.
The flip side is that a malformed JWT **fails silently**. If the contact still
shows up as "Visitor ####", check in this order: that the secret belongs to the
**same channel** as the token, that `exp` is in **seconds** (not milliseconds) and
less than 7 days away, that the claim is named `sub`, and that the algorithm is
**HS256**.
Before the JWT, identity was passed with three separate attributes. **It still
works and you don't need to migrate**: if you set both schemes at once, the JWT
wins, and if the JWT is broken it falls back to this one.
| Attribute | What it is |
| ---------------------- | ----------------------------------------------------------- |
| `data-mindo-user` | Your user's unique identifier (`userId`). |
| `data-mindo-expires` | Unix timestamp (seconds) until when the signature is valid. |
| `data-mindo-signature` | `HMAC_SHA256(secret, "{userId}:{expires}")` in hexadecimal. |
```javascript Node.js theme={null}
const crypto = require("crypto");
function signVisitor(userId, channelSecret, ttlSeconds = 60 * 60 * 24) {
const expires = Math.floor(Date.now() / 1000) + ttlSeconds;
const signature = crypto
.createHmac("sha256", channelSecret)
.update(`${userId}:${expires}`)
.digest("hex");
return { userId, expires, signature };
}
```
```python Python theme={null}
import hmac
import hashlib
import time
def sign_visitor(user_id, channel_secret, ttl_seconds=60 * 60 * 24):
expires = int(time.time()) + ttl_seconds
message = f"{user_id}:{expires}".encode("utf-8")
signature = hmac.new(
channel_secret.encode("utf-8"), message, hashlib.sha256
).hexdigest()
return {"userId": user_id, "expires": expires, "signature": signature}
```
```html theme={null}
```
**Why the JWT is the better choice if you're starting now**: this scheme signs
the string `userId:expires` using `:` as a separator, so it can't carry a name
or an email without becoming ambiguous. The JWT signs the exact data and lets
you send `name`, `email` and `phone` — which is what gives the contact a real
name and merges it with their WhatsApp chat.
If your site is an SPA, or the visitor opens the chat **before** logging in, there's
no need to reload the page for MINDO to recognize them. The widget exposes a
`window.Mindo` object:
```javascript theme={null}
// After your user logs in, with the JWT your backend signed:
window.Mindo.setUser(identityToken);
// On logout:
window.Mindo.clearUser();
```
The script loads with `async`, so `window.Mindo` may not exist yet when your code
runs. That's what the command queue is for: queue the calls and the widget processes
them once it finishes loading.
```javascript theme={null}
window.Mindo = window.Mindo || { q: [] };
(window.Mindo.q = window.Mindo.q || []).push(["setUser", identityToken]);
```
You can also do it **without writing any integration code**: if your page stores the
JWT in `localStorage` under the key `mindo_identity`, the widget picks it up on its
own. This covers logging in from a new tab or through an OAuth redirect, because the
widget listens for changes to that key. The same value can be broadcast over a
`BroadcastChannel` named `mindo-identity`.
Besides `setUser` and `clearUser`, `window.Mindo` exposes `open()`, `close()` and
`toggle()` to control the panel from your own UI (for example, a "Need help?"
button), and `on(event, callback)` / `off(event, callback)` to listen for `open`,
`close`, `unread`, `identity`, `identity:cleared`, `auth:login` and
`auth:register`.
The widget can show the **anonymous** visitor a block with **Log in** and **Sign up**
buttons pointing to your site's pages. It disappears on its own once the visitor is
identified.
 You configure it in **Settings → Channels → Web chat widget**, editing the channel:
turn on **Login buttons** and fill in the URLs, the button labels and the message
above them.
You configure it in **Settings → Channels → Web chat widget**, editing the channel:
turn on **Login buttons** and fill in the URLs, the button labels and the message
above them.
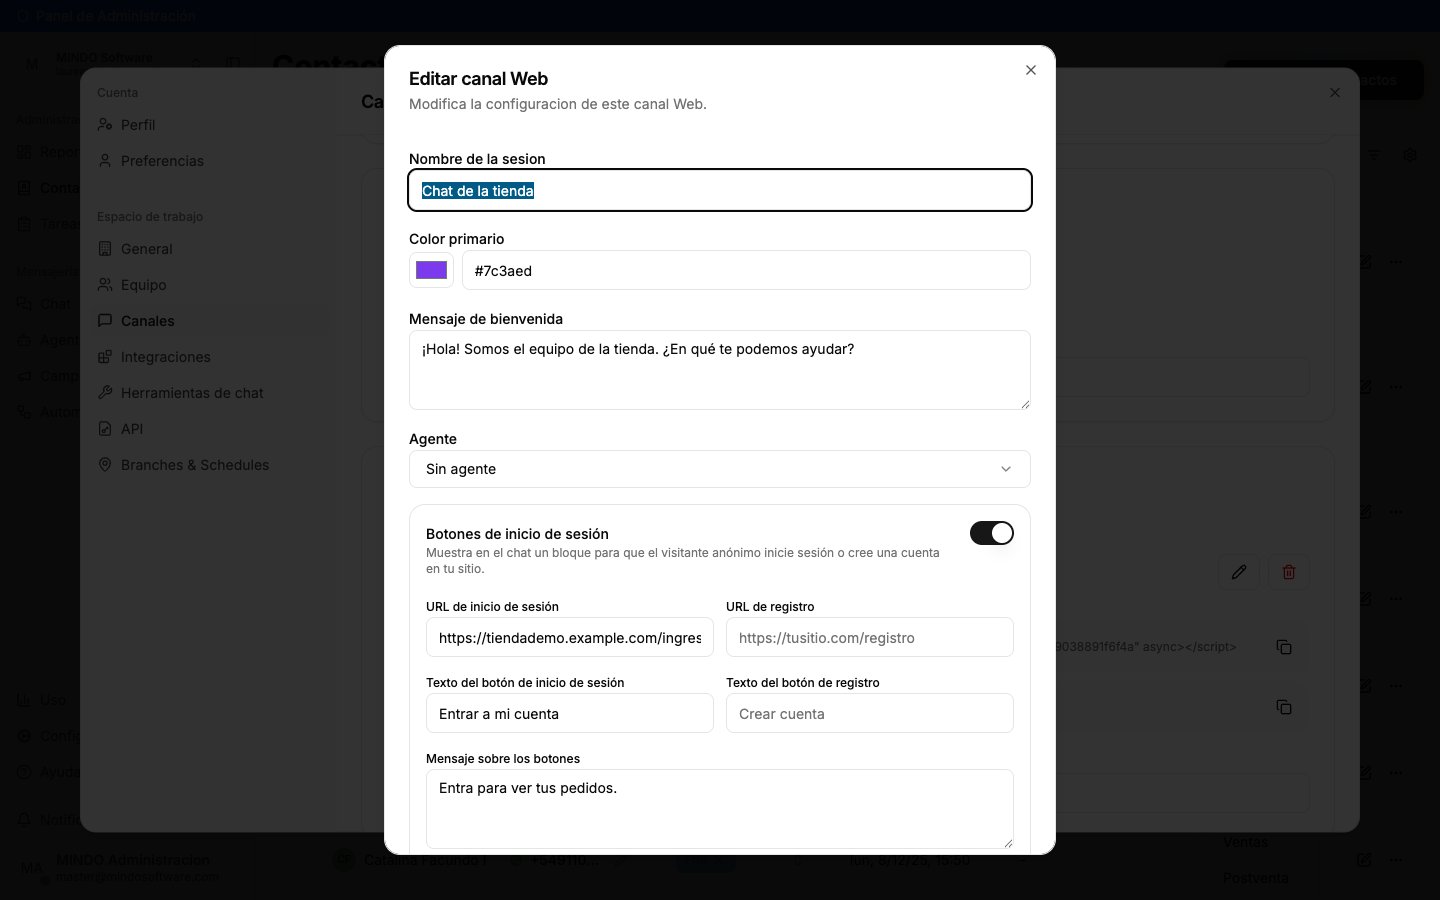 | Field | What it is |
| ----------------------------- | --------------------------------------------------- |
| **Login URL** | Where to send a visitor who already has an account. |
| **Sign-up URL** | Where to send them if they don't have one yet. |
| **Button labels** | Optional. Default to "Log in" and "Sign up". |
| **Message above the buttons** | The sentence explaining why logging in is worth it. |
**One** of the two URLs is enough: the button without a URL isn't rendered.
You can also do it through the API, with an ADMIN user of the company:
```bash theme={null}
curl -X PATCH https://api.mindosoftware.com/web-widget/channels// \
-H "Authorization: Bearer " \
-H "Content-Type: application/json" \
-d '{
"auth": {
"enabled": true,
"loginUrl": "https://yoursite.com/login",
"registerUrl": "https://yoursite.com/signup",
"loginLabel": "Log in",
"registerLabel": "Sign up",
"prompt": "Log in to see your orders and pick up the conversation from any device."
}
}'
```
On click, the widget opens the URL in a new tab. If you'd rather handle navigation
yourself (for example, opening your own login modal), intercept it: returning
`false` from the handler cancels the opening.
```javascript theme={null}
window.Mindo.on("auth:login", ({ url }) => {
openMyLoginModal();
return false;
});
```
URLs must be **`https://`**. An `http://` one is rejected on save, and if it was
loaded by hand from the admin the button simply isn't rendered.
Send the block in the **`auth`** field, not inside `config`. An explicit `config`
**replaces** the stored one (except for `prechat` and `auth`), so a
`{"config": {"auth": {...}}}` wipes your color and welcome message. The flat `auth`
field is saved on its own, without touching anything else.
## What happens next?
* Every message a visitor sends creates (or continues) a chat in your MINDO Inbox, with
`Channel: Web`.
* If you identified the visitor and that same person writes from another device with the
same `sub`, MINDO merges the history under a single contact.
* If the JWT includes `phone` and that number already exists as a WhatsApp contact, MINDO
merges them: you get **one contact with both conversations** (the widget one and the
WhatsApp one) instead of two different people.
* If you have an AI agent assigned to the channel, it can reply automatically; if not,
the chat waits for a human reply like any other channel.
## Frequently asked questions
No. The `
| Field | What it is |
| ----------------------------- | --------------------------------------------------- |
| **Login URL** | Where to send a visitor who already has an account. |
| **Sign-up URL** | Where to send them if they don't have one yet. |
| **Button labels** | Optional. Default to "Log in" and "Sign up". |
| **Message above the buttons** | The sentence explaining why logging in is worth it. |
**One** of the two URLs is enough: the button without a URL isn't rendered.
You can also do it through the API, with an ADMIN user of the company:
```bash theme={null}
curl -X PATCH https://api.mindosoftware.com/web-widget/channels// \
-H "Authorization: Bearer " \
-H "Content-Type: application/json" \
-d '{
"auth": {
"enabled": true,
"loginUrl": "https://yoursite.com/login",
"registerUrl": "https://yoursite.com/signup",
"loginLabel": "Log in",
"registerLabel": "Sign up",
"prompt": "Log in to see your orders and pick up the conversation from any device."
}
}'
```
On click, the widget opens the URL in a new tab. If you'd rather handle navigation
yourself (for example, opening your own login modal), intercept it: returning
`false` from the handler cancels the opening.
```javascript theme={null}
window.Mindo.on("auth:login", ({ url }) => {
openMyLoginModal();
return false;
});
```
URLs must be **`https://`**. An `http://` one is rejected on save, and if it was
loaded by hand from the admin the button simply isn't rendered.
Send the block in the **`auth`** field, not inside `config`. An explicit `config`
**replaces** the stored one (except for `prechat` and `auth`), so a
`{"config": {"auth": {...}}}` wipes your color and welcome message. The flat `auth`
field is saved on its own, without touching anything else.
## What happens next?
* Every message a visitor sends creates (or continues) a chat in your MINDO Inbox, with
`Channel: Web`.
* If you identified the visitor and that same person writes from another device with the
same `sub`, MINDO merges the history under a single contact.
* If the JWT includes `phone` and that number already exists as a WhatsApp contact, MINDO
merges them: you get **one contact with both conversations** (the widget one and the
WhatsApp one) instead of two different people.
* If you have an AI agent assigned to the channel, it can reply automatically; if not,
the chat waits for a human reply like any other channel.
## Frequently asked questions
No. The `