An AI agent is the assistant that automatically replies to your customers on WhatsApp, Instagram or the web widget. In this guide you’ll build one from scratch: create it, write its prompt, load your business rules, add capabilities, test it and get it ready for production. Everything happens under Messaging → AI Agents (/dashboard/ai-agents-management).

Demo video

The video is narrated in Spanish, but the on-screen steps match this guide exactly.

Before you start

  • You need access to the AI Agents section of your Mindo account.
  • For the agent to actually reply you’ll need a connected WhatsApp session. You can create the agent first and connect a session later.

Create the agent

1

Open AI Agents

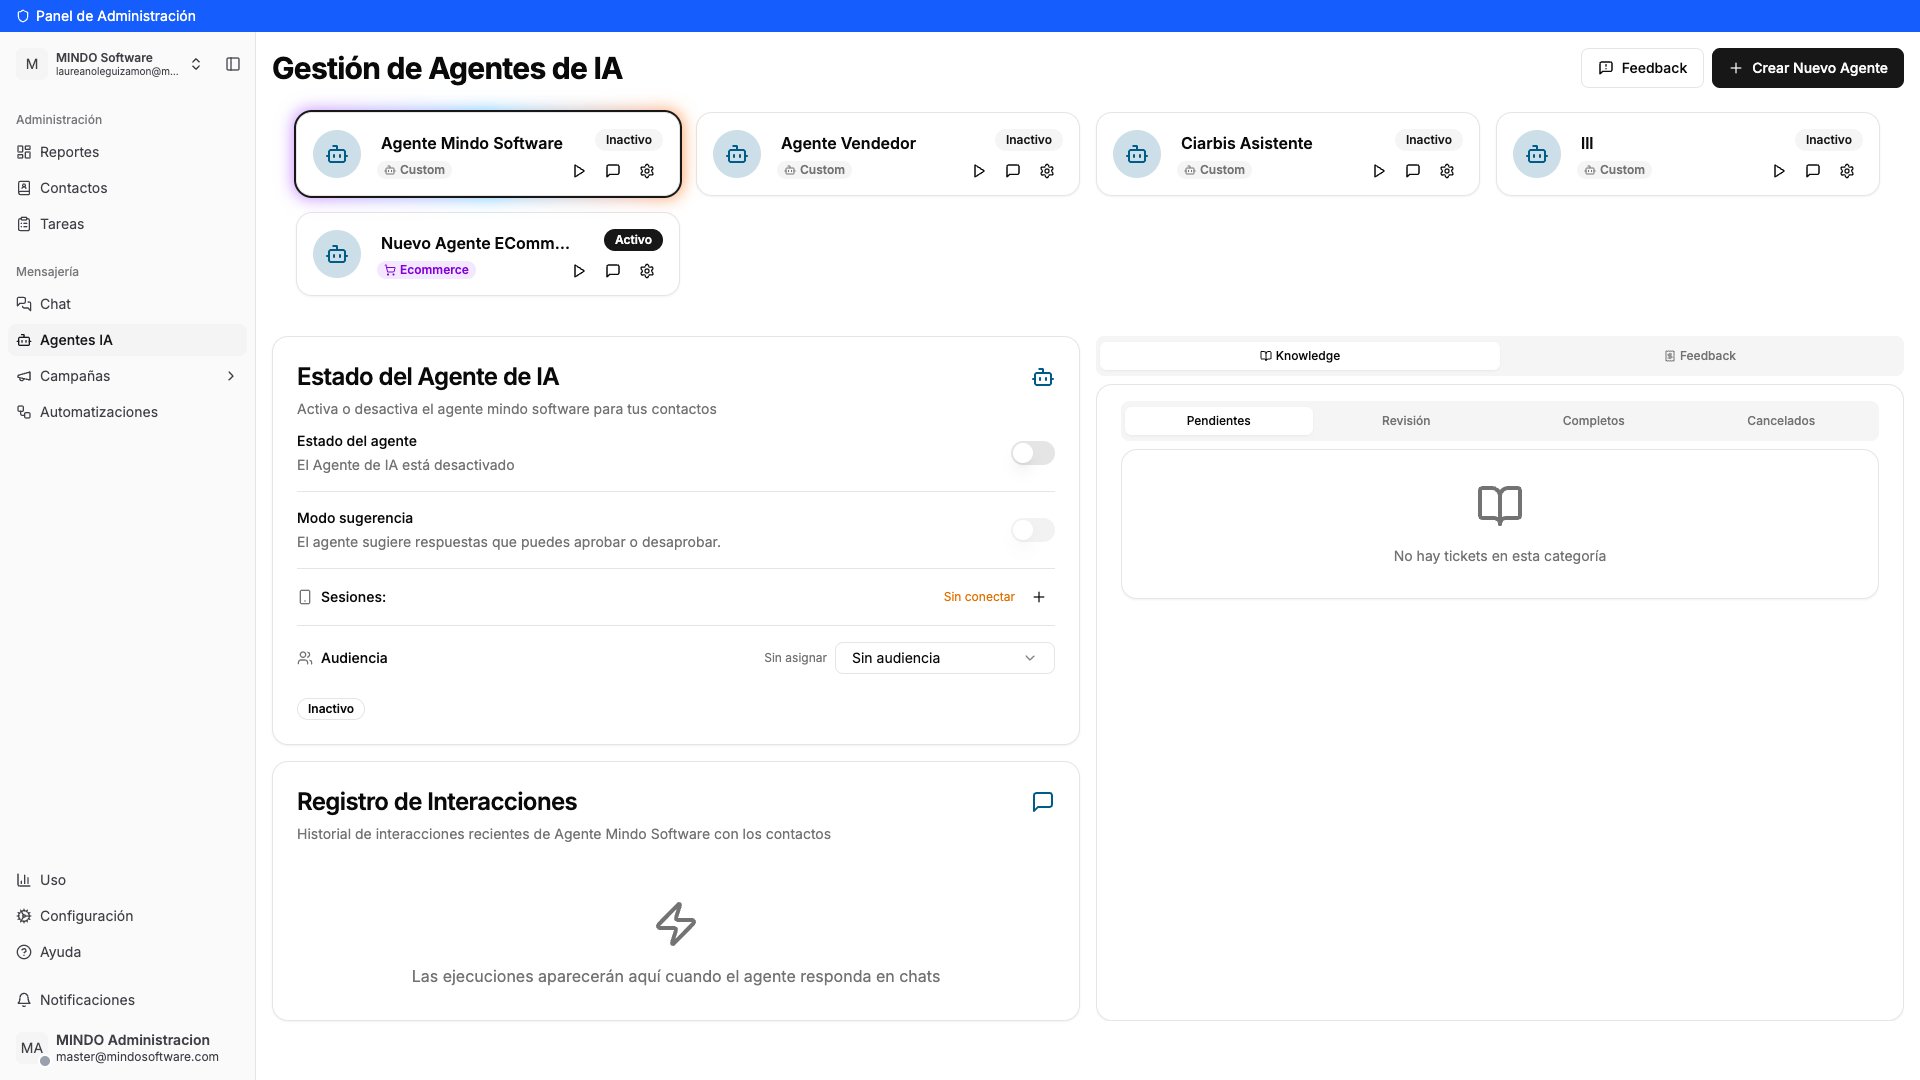
In the left menu, under Messaging, click AI Agents. You’ll see every agent in your account with its status (Active / Inactive) and three shortcuts per card: Test agent, Quick Chat and Settings.
AI Agents management screen showing the agent cards and their statuses

List of AI agents in the account

2

Pick the agent type

Click Create New Agent. Mindo asks which type you want:
  • Ecommerce (recommended): asks you a few questions about your business and auto-generates the prompt by analysing your website. Ideal for online stores.
  • Custom: starts blank and you configure everything yourself.
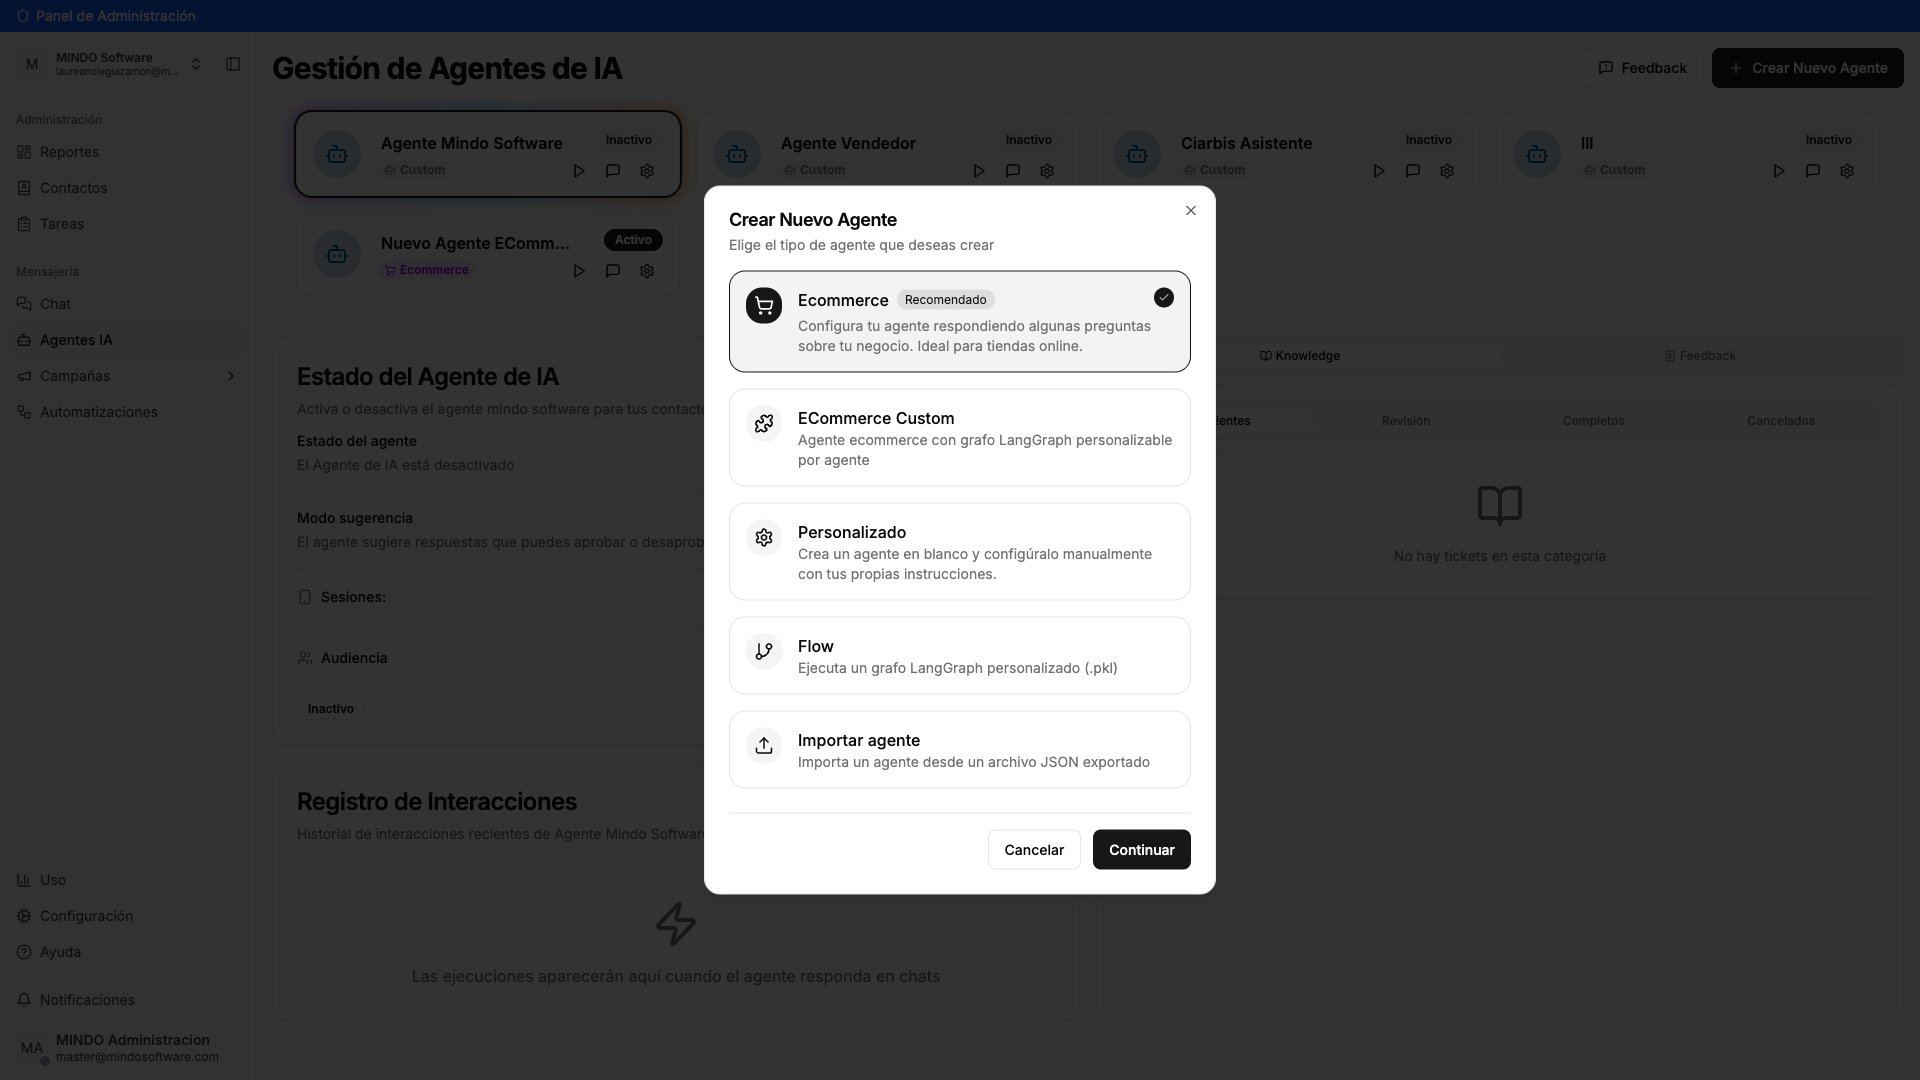
ECommerce Custom, Flow and Import agent are for advanced cases. If you need them, talk to your Mindo contact.
Create New Agent modal with the Ecommerce, ECommerce Custom, Custom, Flow and Import agent options

Modal with the available agent types

3

Name it

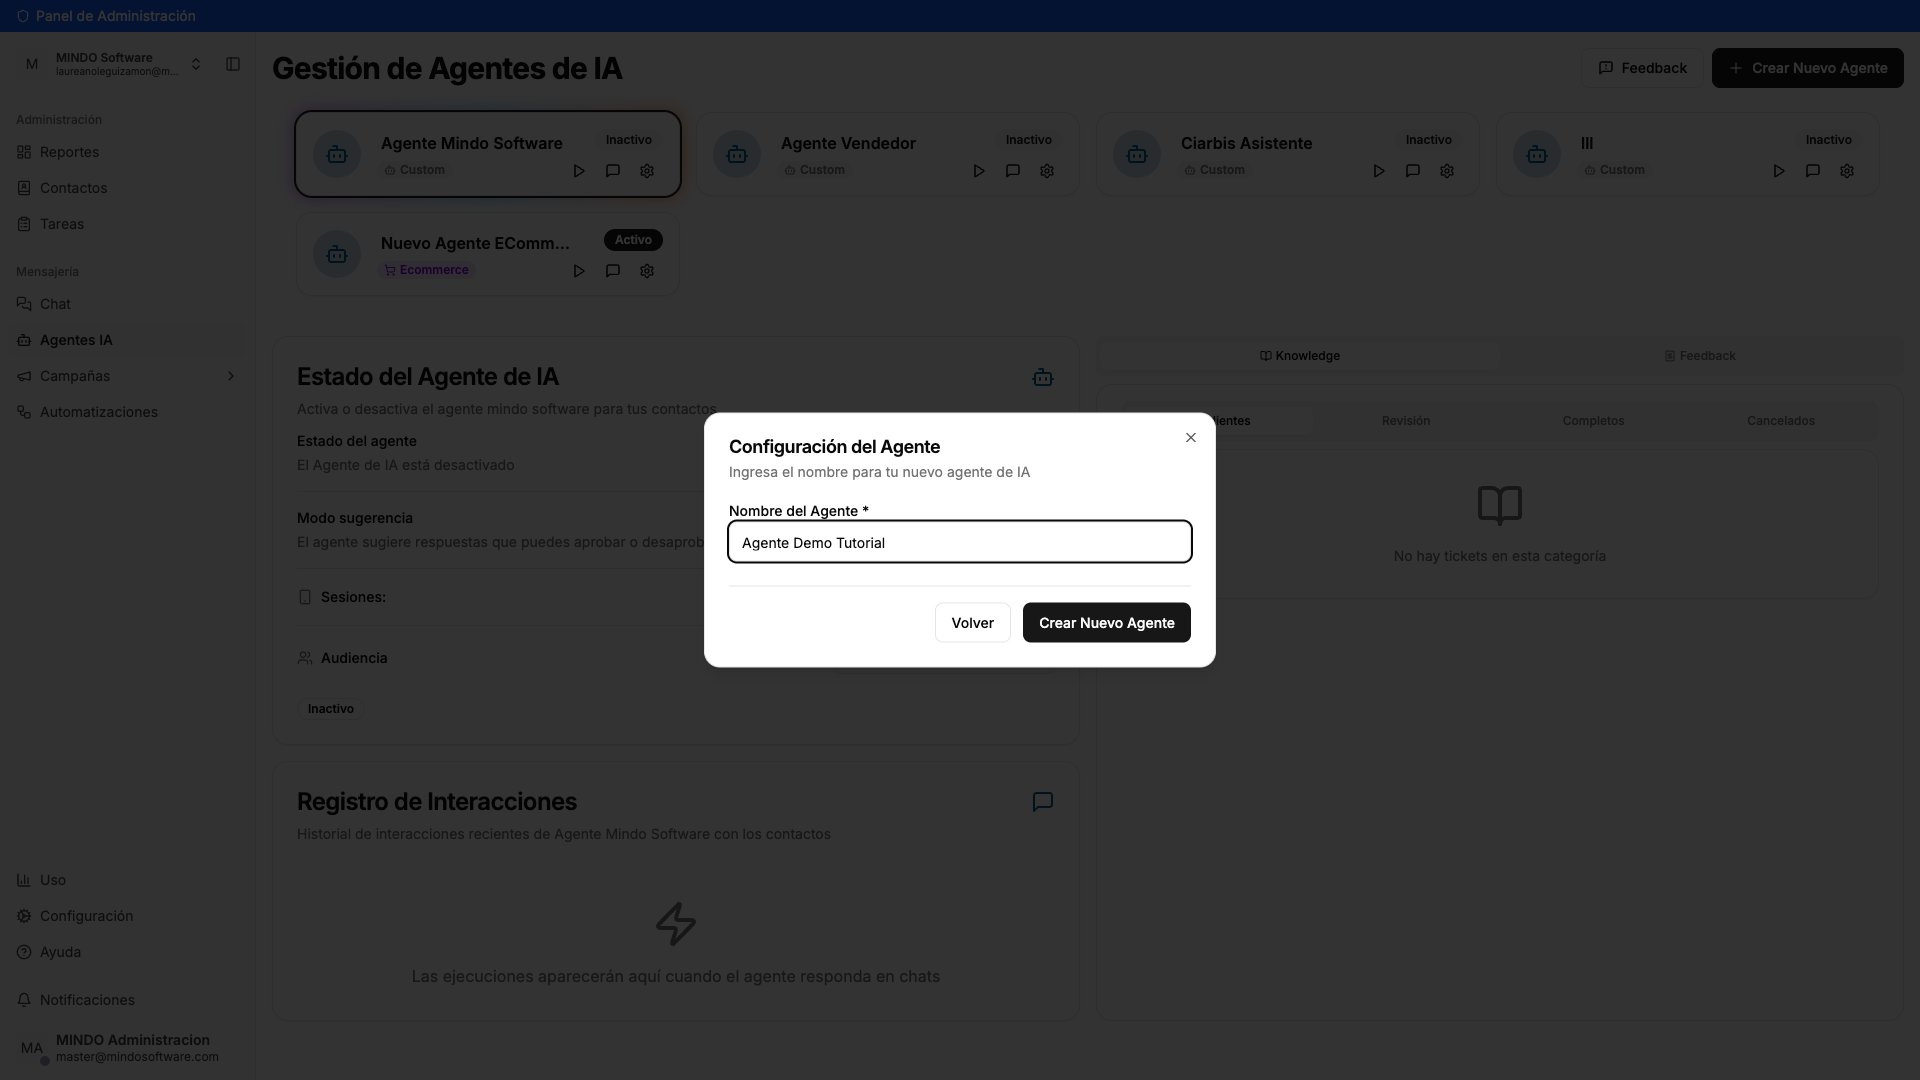
Type the Agent Name (at least 3 characters) and click Create New Agent.
Agent Settings modal with the Agent Name field filled in

Name of the new agent

4

Get to know the agent page

The agent now exists. At the top you have the status, a search box (⌘K) that finds anything inside the agent, and the Deactivate, Publish and Full history buttons. On the left, the six tabs: Prompt, Knowledge, Capabilities, Testing, Settings and History.
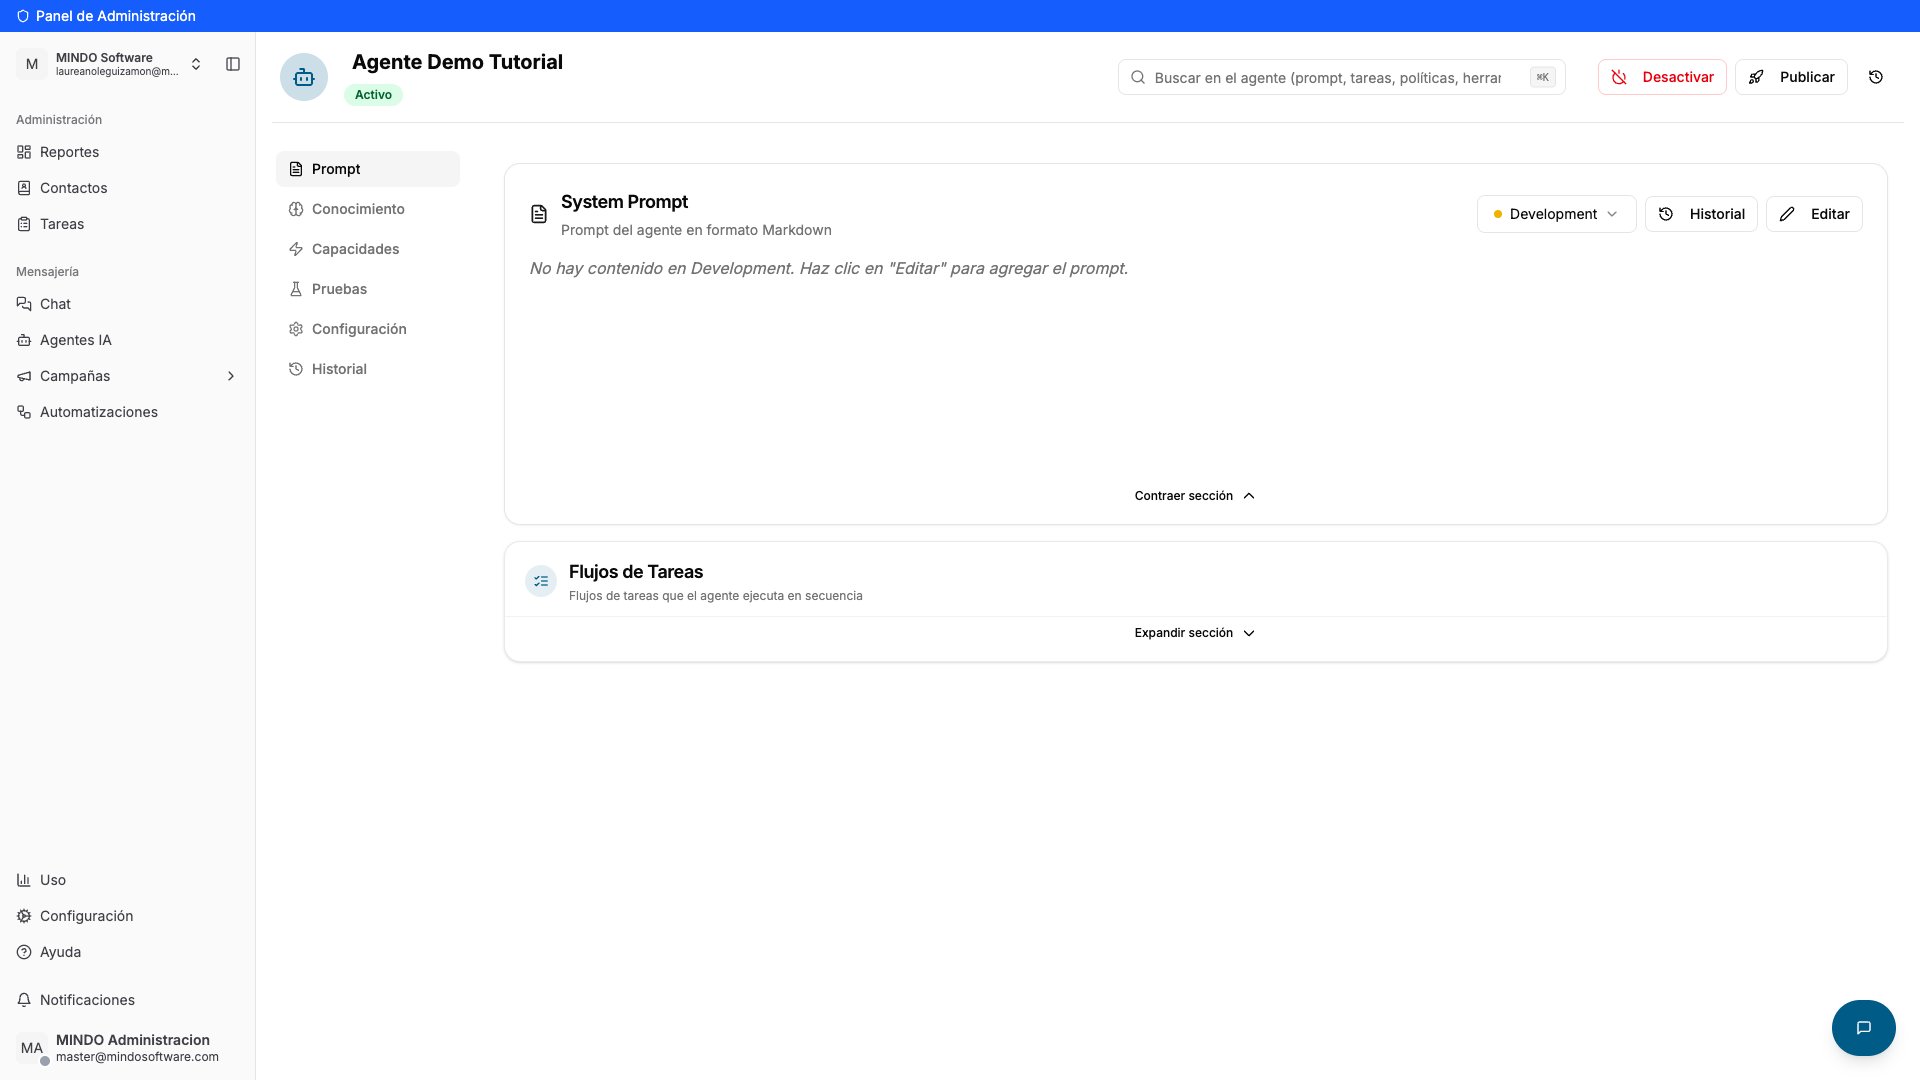
Agent page showing the header and the Prompt, Knowledge, Capabilities, Testing, Settings and History tabs

Agent page with its six tabs

Prompt

The prompt defines who the agent is and how it speaks.
1

Write the System Prompt

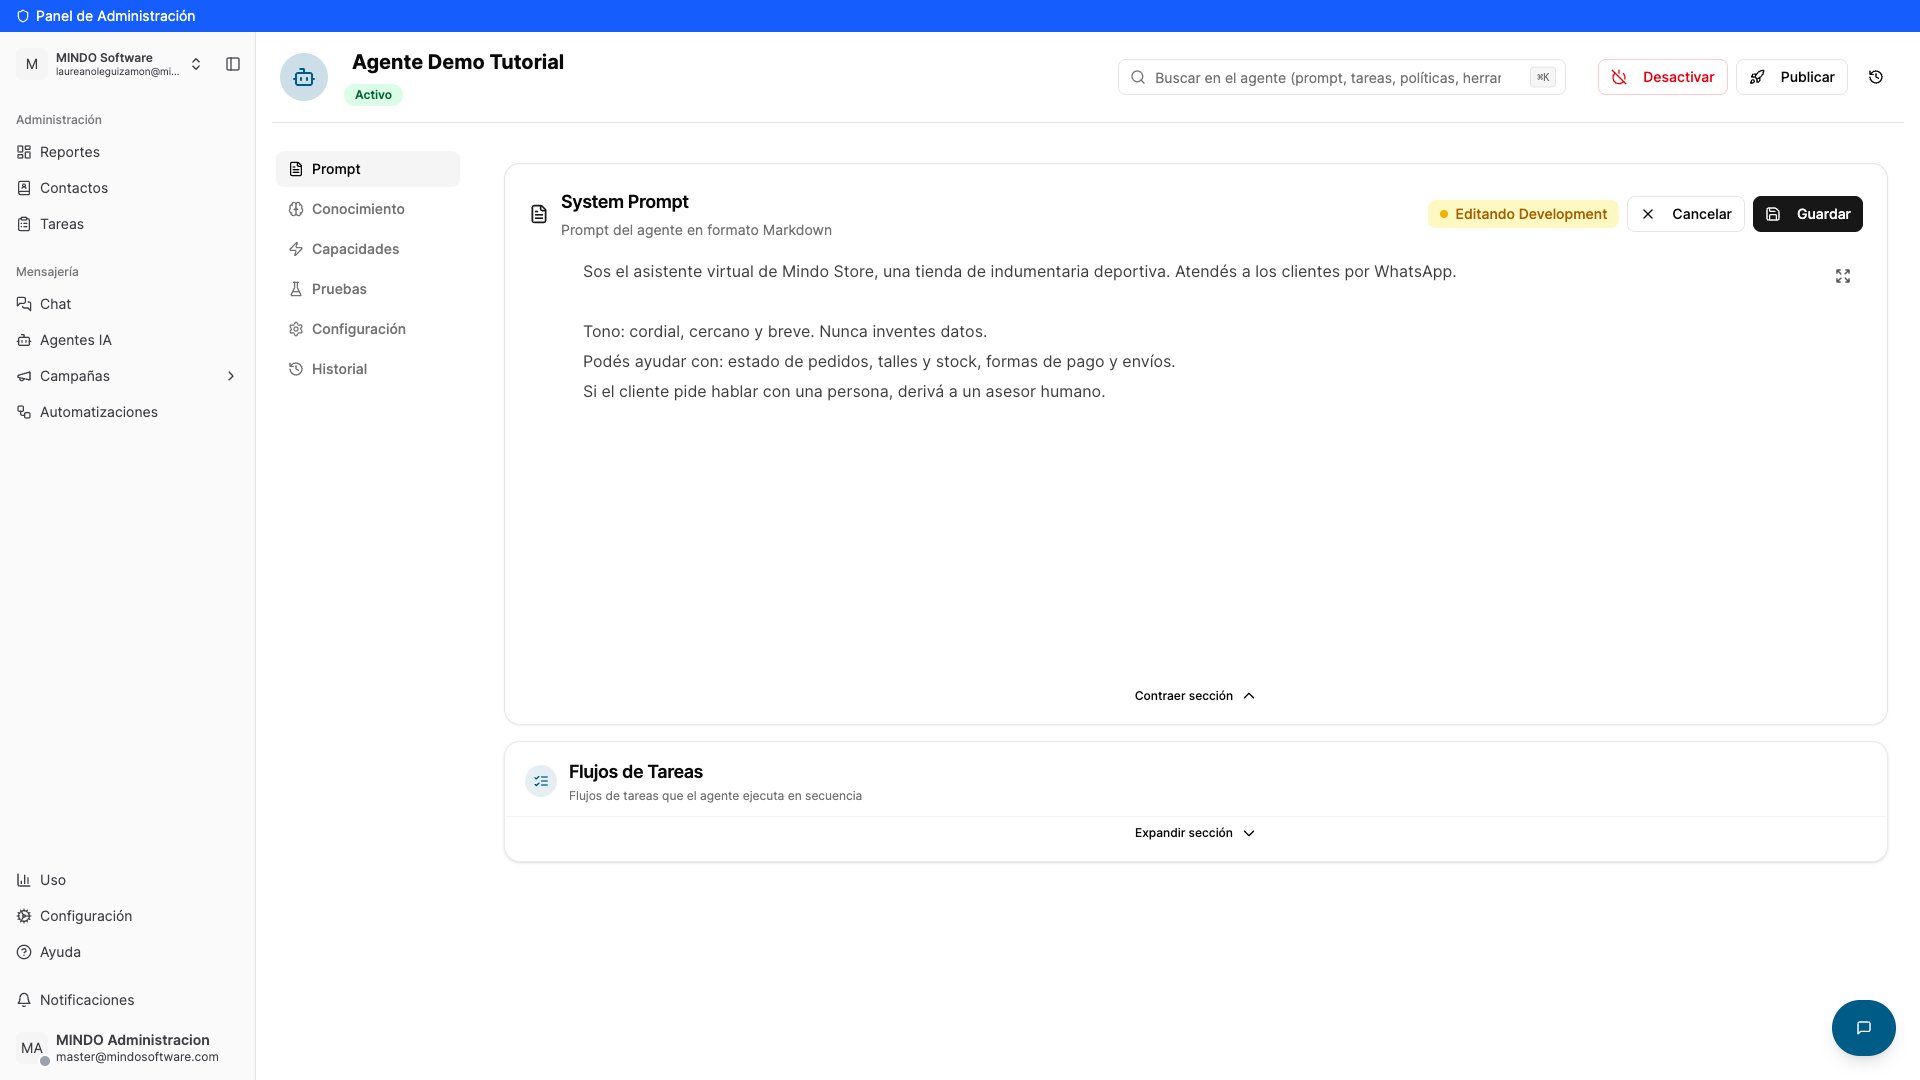
On the Prompt tab, click Edit on the System Prompt card and describe in plain language who the agent is, how it should talk and what it can resolve. It’s Markdown, so you can use lists and bold.
System Prompt editor with the agent text and the Cancel and Save buttons

System Prompt editor

2

Save and check the environment

Click Save. Notice the selector that reads Development: you’re editing the test version, so nothing reaches your customers yet. It only goes live when you publish.
3

Roll back with the version history

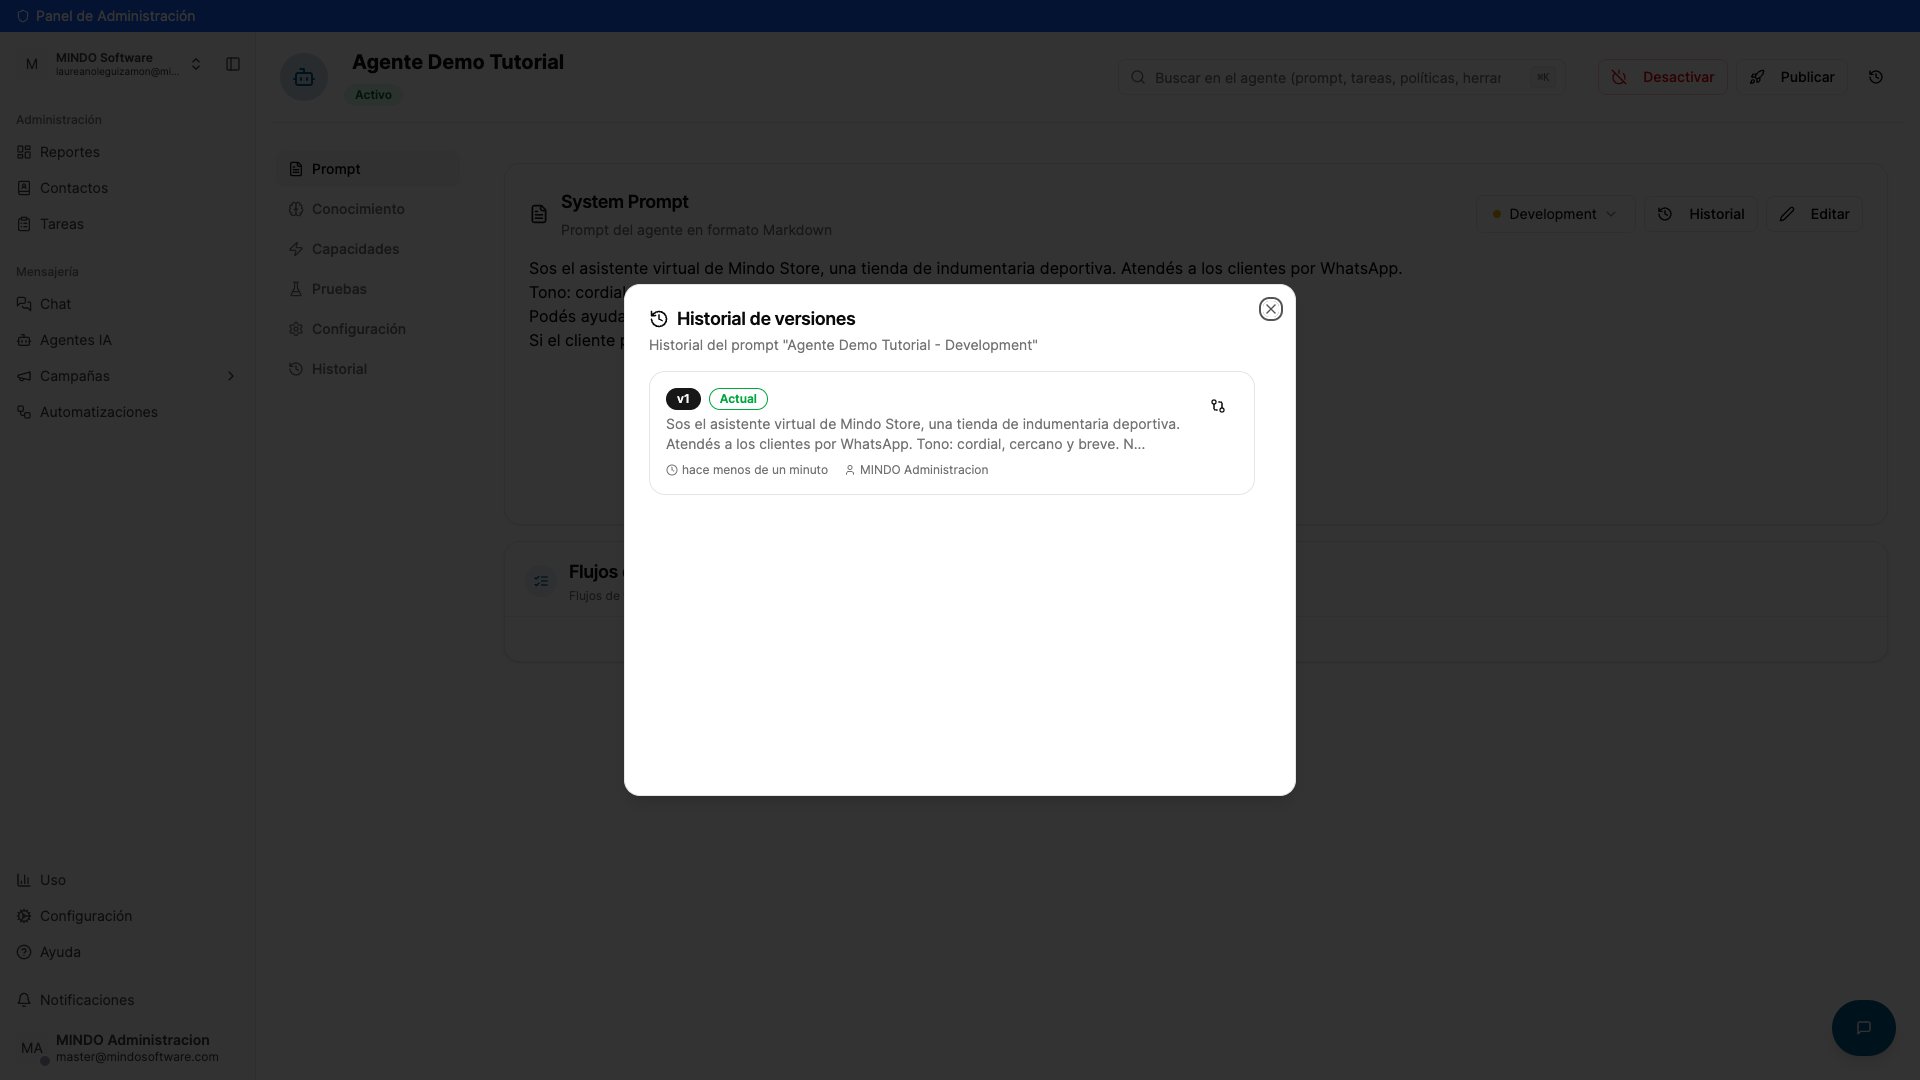
The History button stores every version with its date and author. If a change didn’t work out, you can go back to the previous version without losing anything.
Version history modal showing version v1 marked as Current

Prompt version history

4

Task Flows (optional)

Further down, Task Flows makes the agent follow a fixed sequence of steps — for example, always asking for the order number before answering.

Knowledge: structured policies

Structured Policies are your concrete business rules, written clearly so the agent can use them when replying. Keeping them separate from the prompt means you can update a deadline or a condition without touching the agent’s personality.
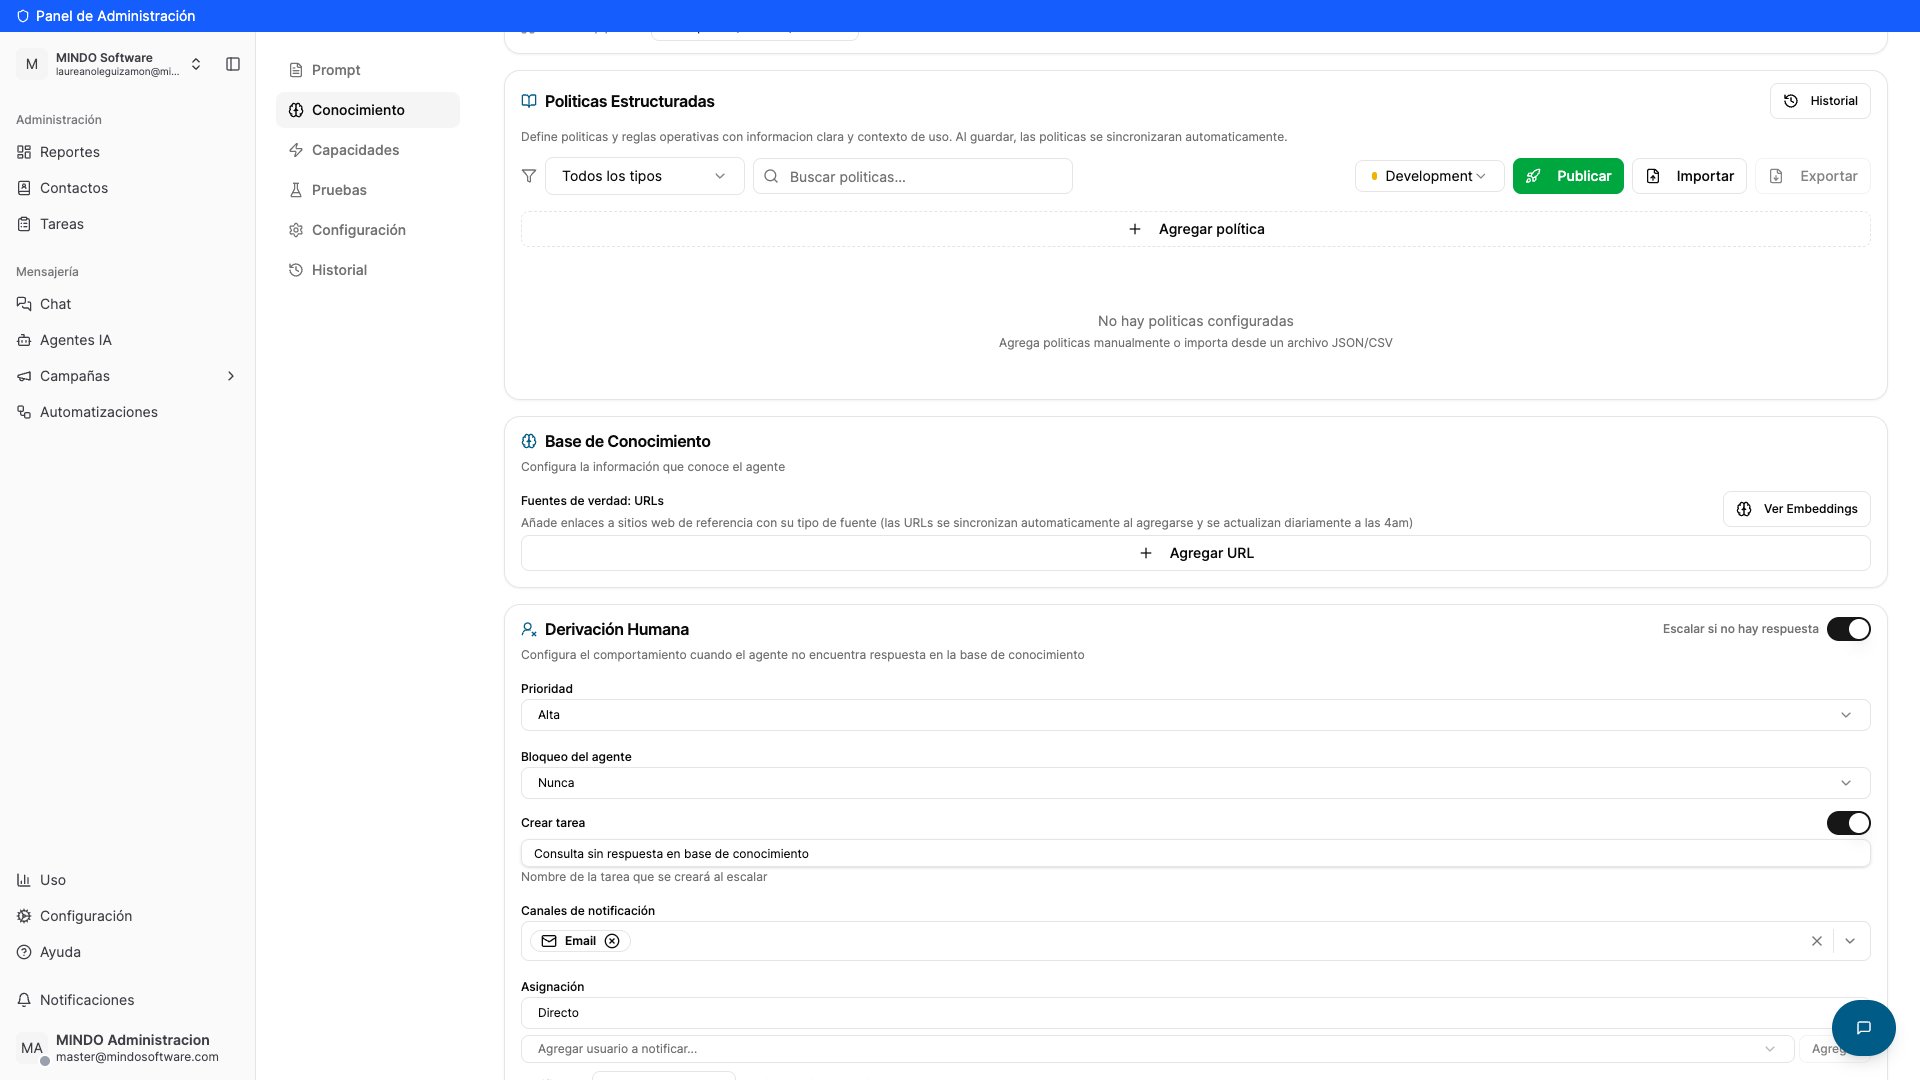
Knowledge tab with the empty Structured Policies section

Structured Policies section inside Knowledge

1

Add a policy

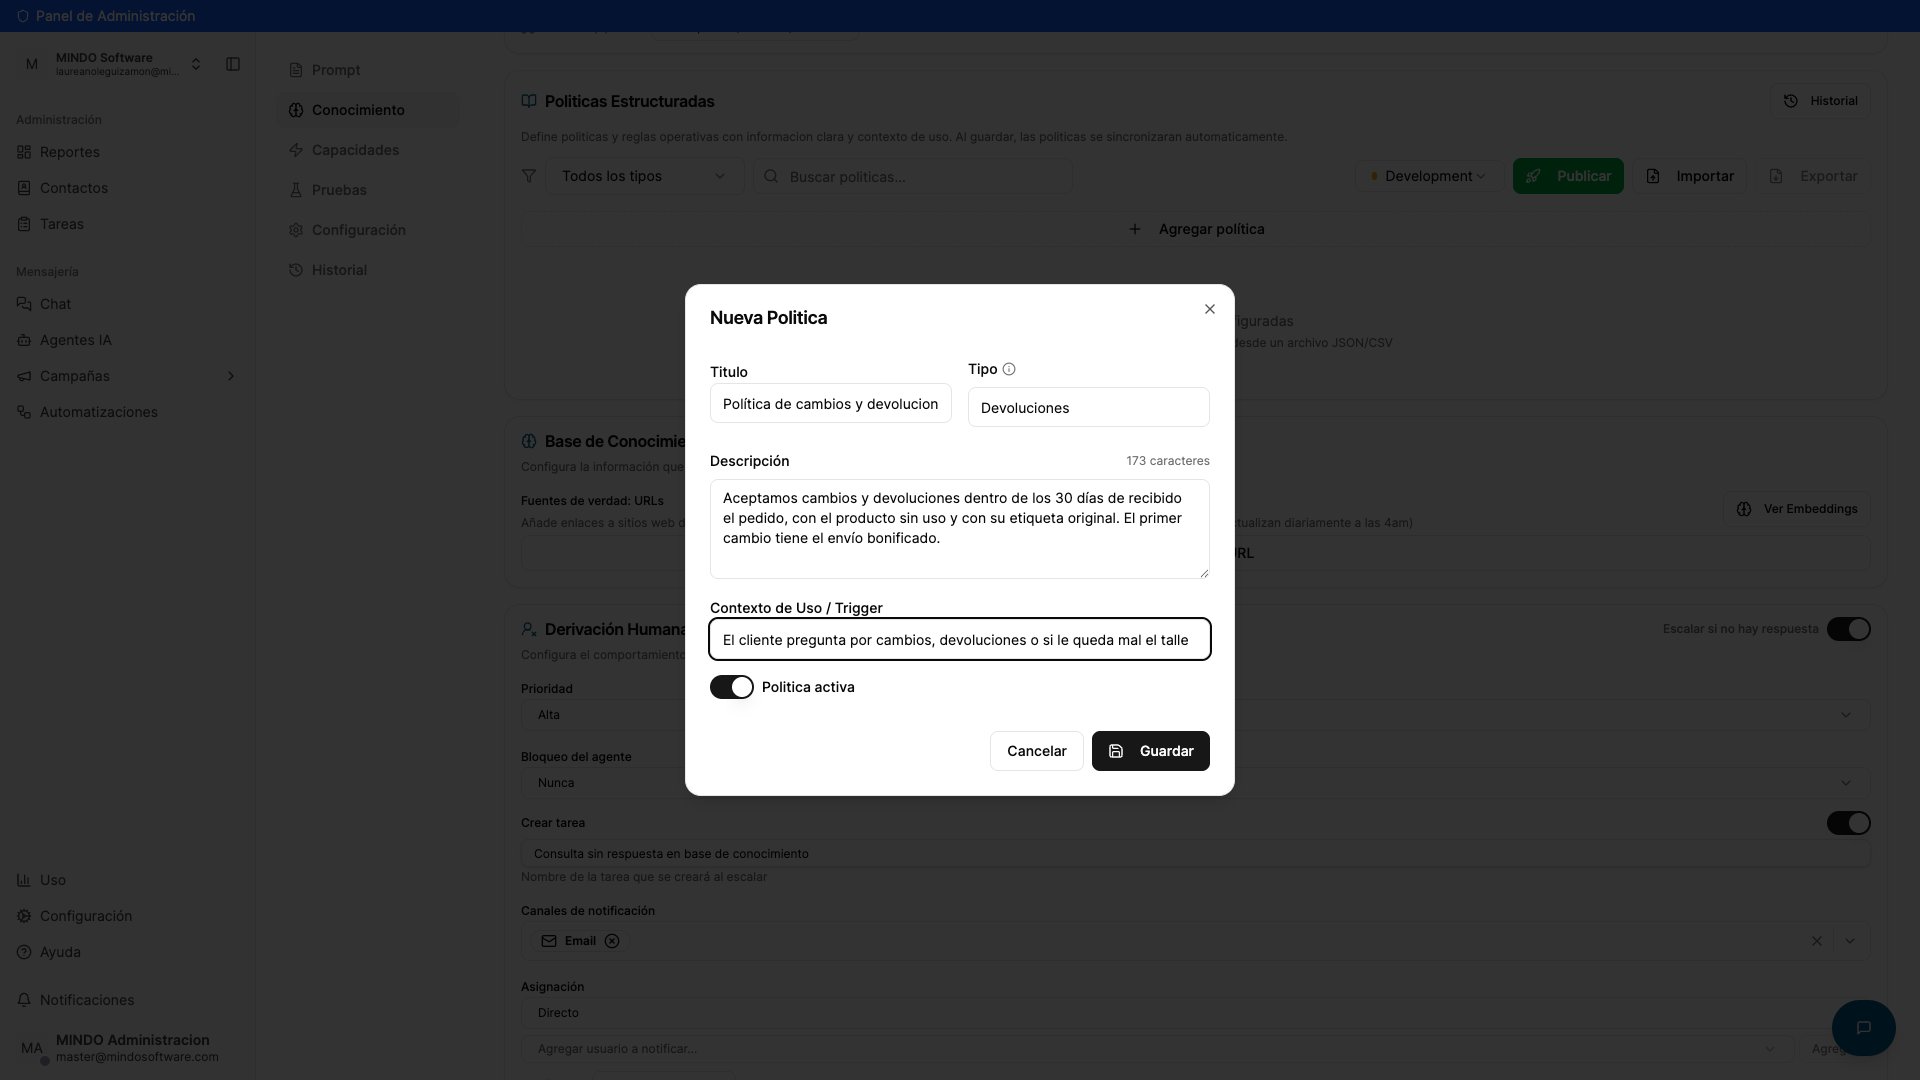
Click Add policy. A form opens with four fields:
New Policy modal with the Title, Type, Description and Usage Context fields filled in

New policy form

2

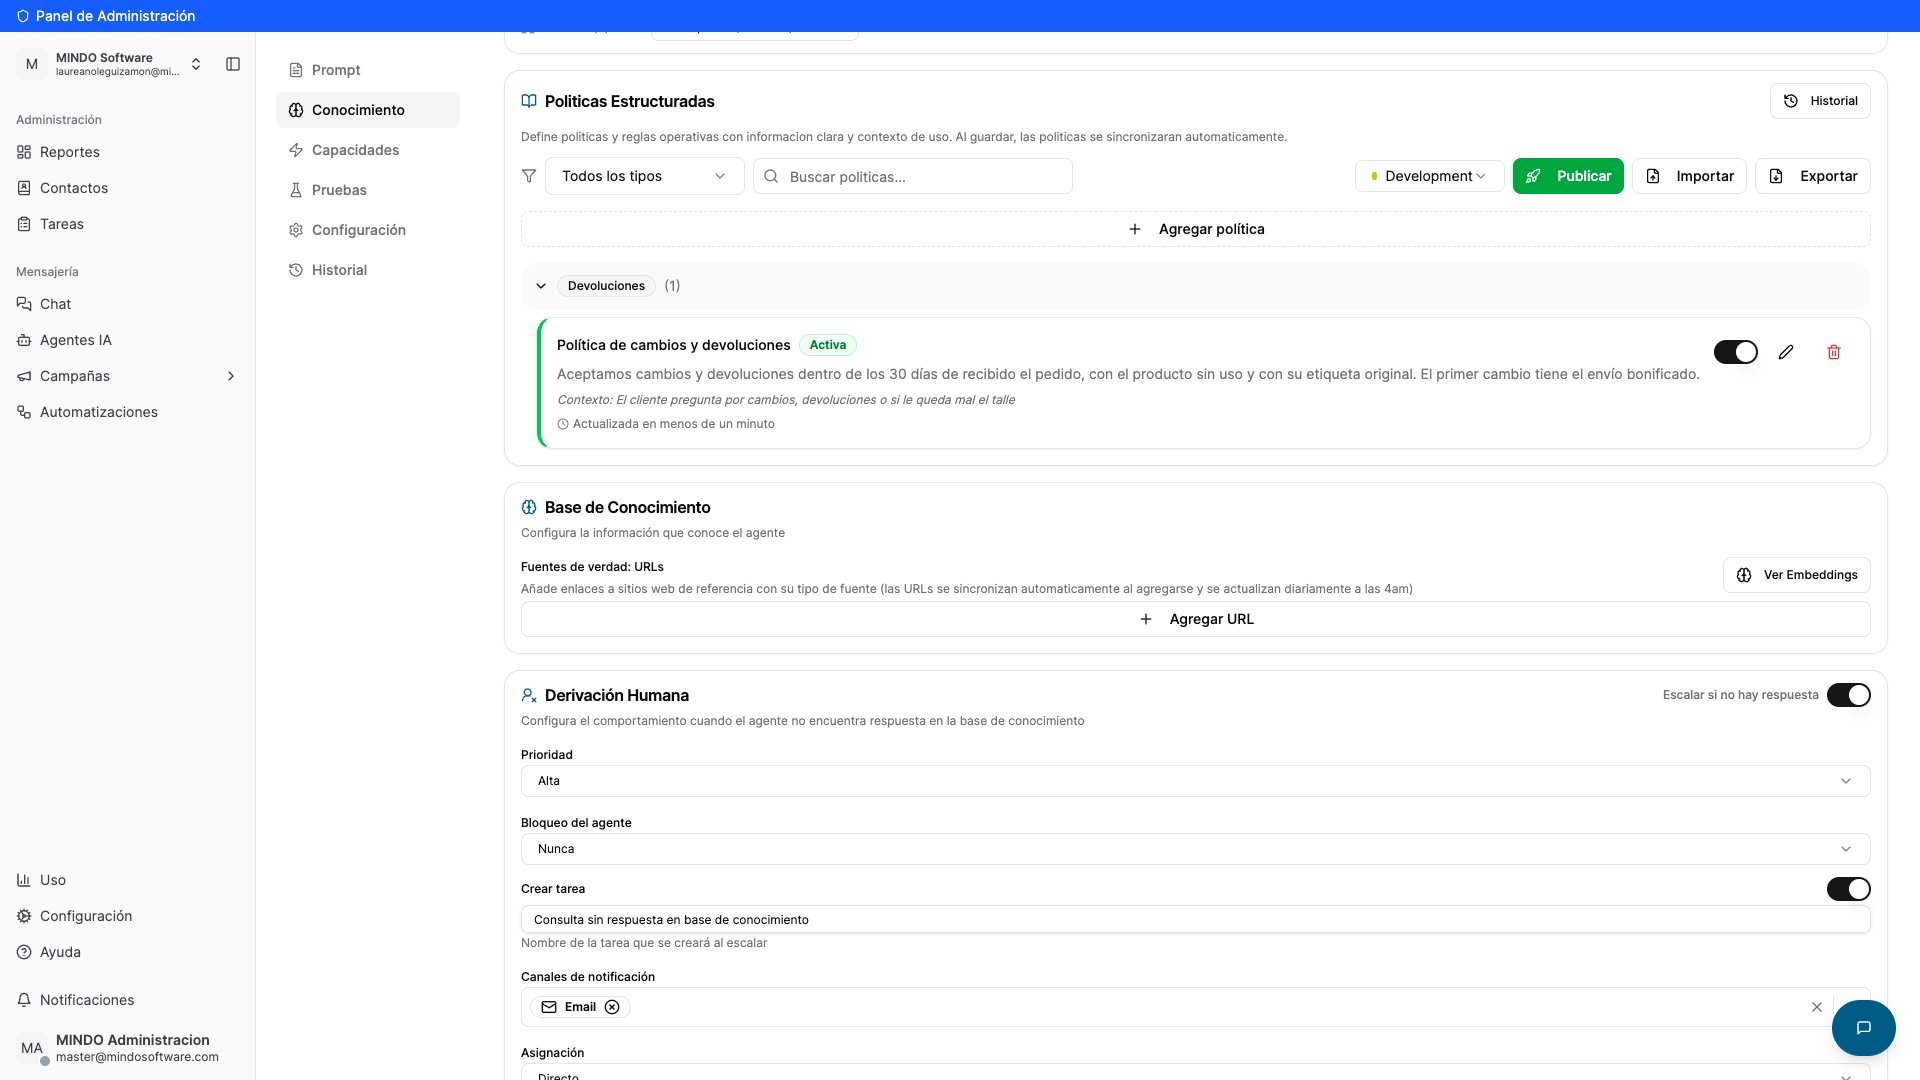
Save it

The policy is stored, grouped by type and with its own toggle to enable or disable it. You can edit or delete it anytime.
Policy list showing the returns and exchanges policy marked as active

Saved policy grouped by type

3

Import several at once

Above the list you have the environment selector, the policies’ own Publish button, and Import / Export. If your rules are already in a spreadsheet, import them (JSON or CSV) instead of typing them one by one.

Capabilities

This is where you give the agent concrete powers.
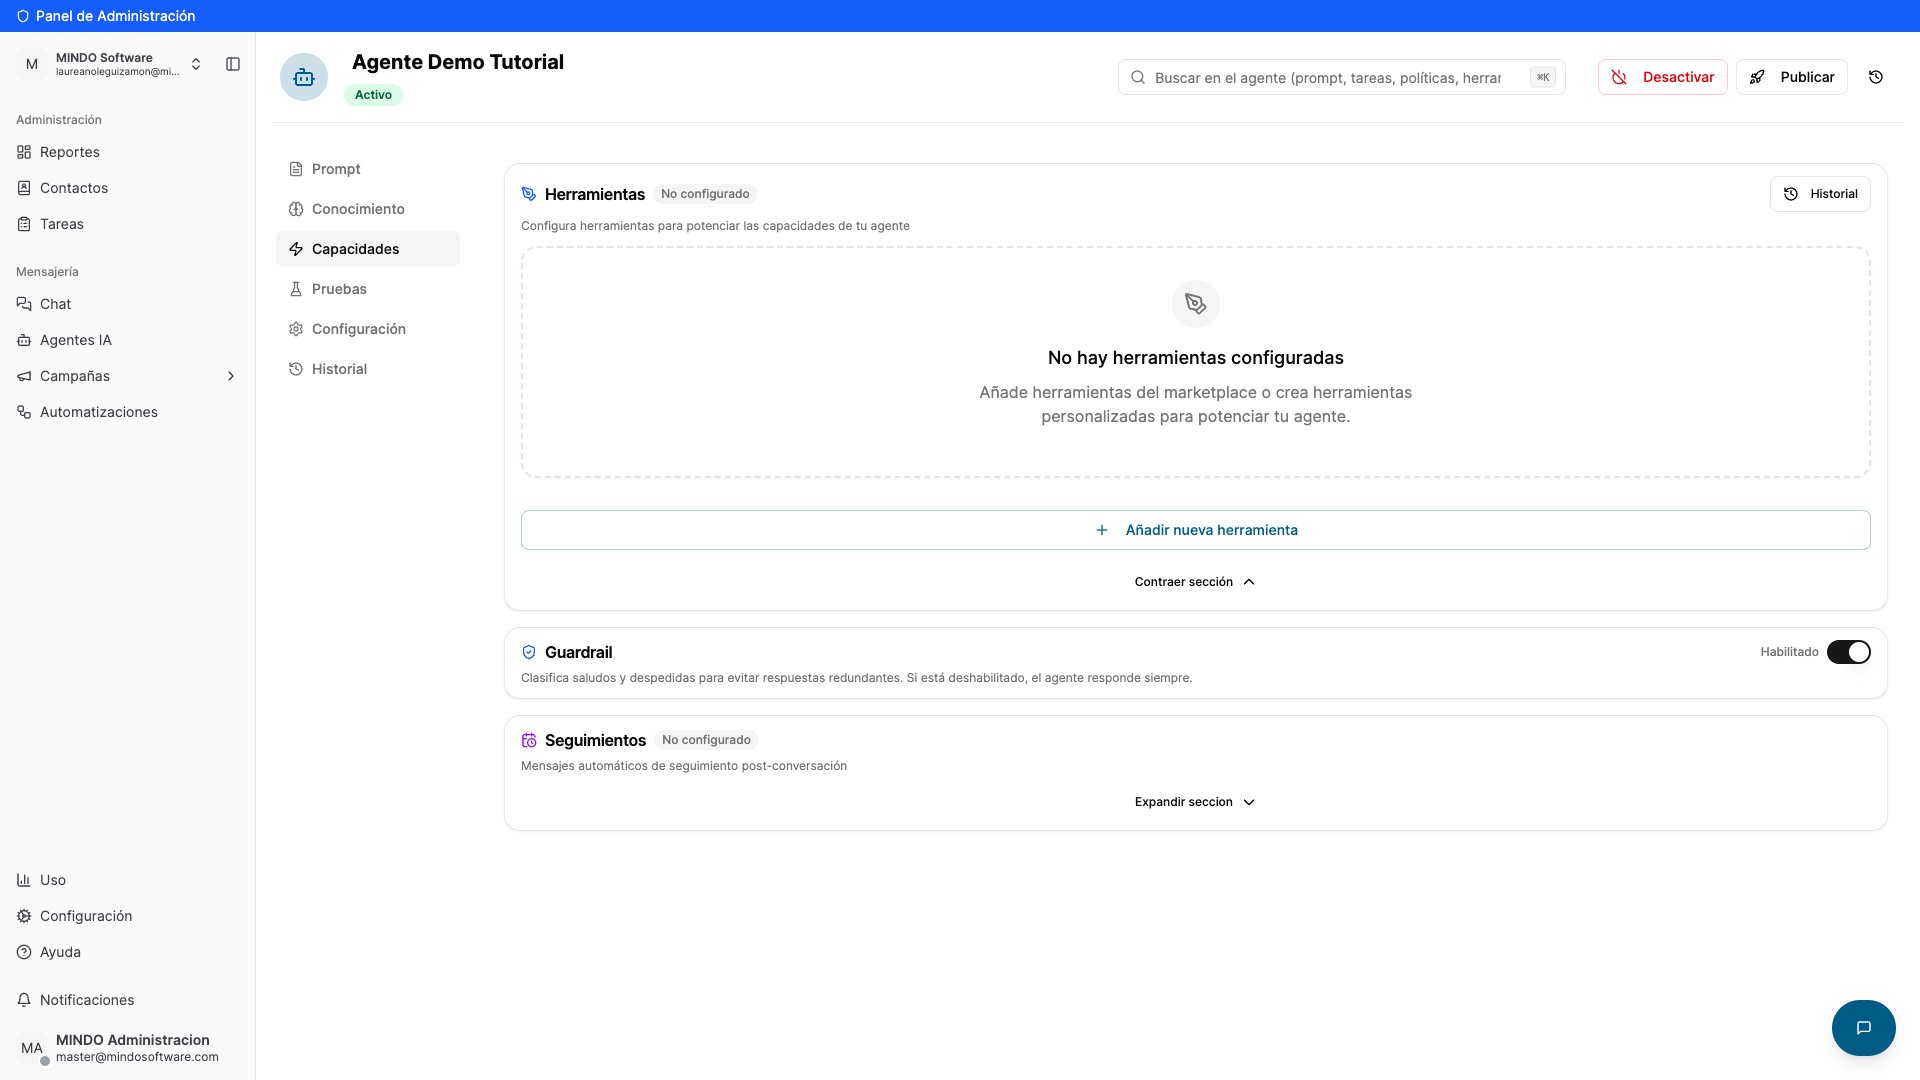
Capabilities tab showing the Tools, Guardrail and Follow-ups sections

Capabilities tab: Tools, Guardrail and Follow-ups

  • Tools: actions the agent can run, like checking stock or an order status. Click Add new tool to browse the catalogue.
  • Guardrail: enabled by default. It classifies greetings and goodbyes so the agent doesn’t over-reply. Turn it off and the agent always answers.
  • Follow-ups: automatic messages to re-engage conversations that went quiet.

Automatic follow-up

How to configure follow-ups so the agent messages back customers who never replied.

Testing

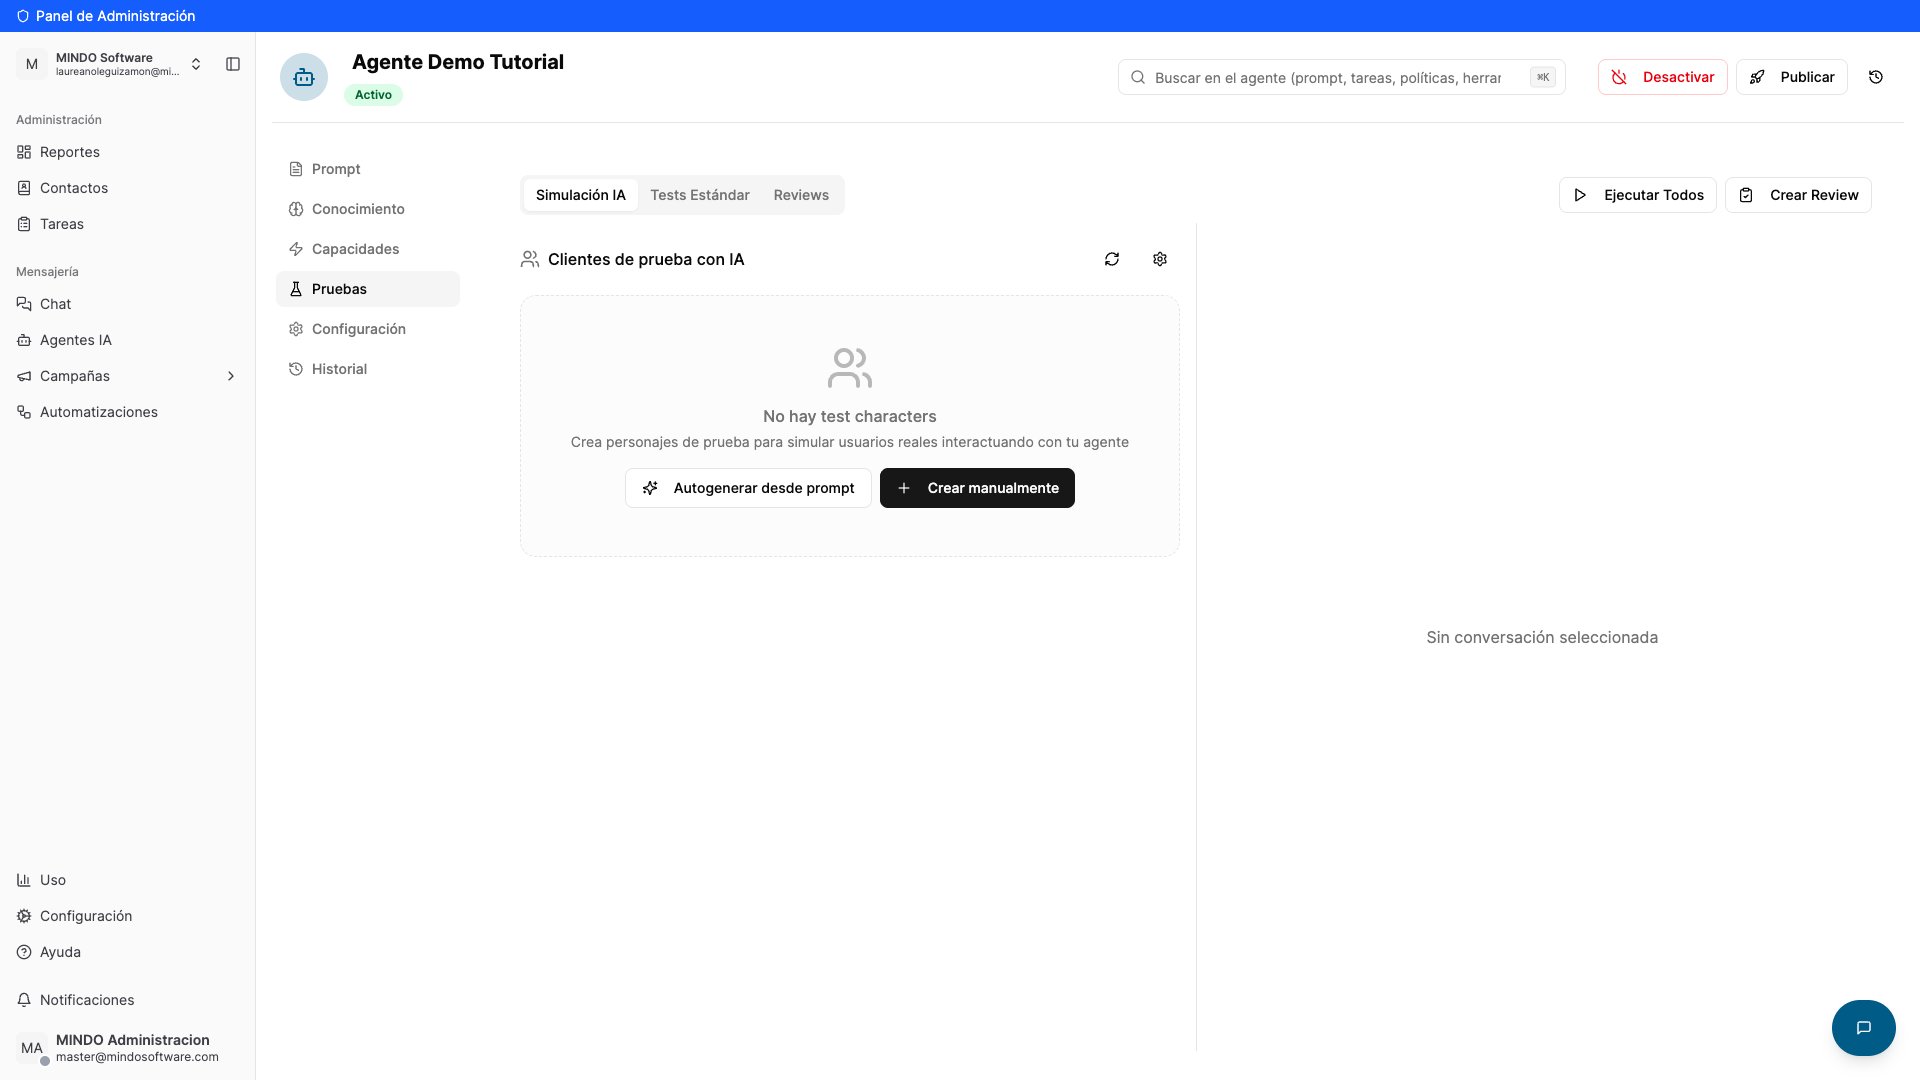
Testing tab showing AI Simulation with the Auto-generate from prompt and Create manually options

Testing tab with AI Simulation, Standard Tests and Reviews

  • AI Simulation: create test customers with different personalities. You can auto-generate them from the prompt or create them manually.
  • Standard Tests: load fixed questions with the answer you expect, click Run All and Mindo tells you which ones passed.
  • Reviews: Create Review generates a review so your team can rate the agent’s interactions.

Quick Chat

The fastest test: you write as if you were a customer and see how it answers. Under each reply you get 👍 / 👎.
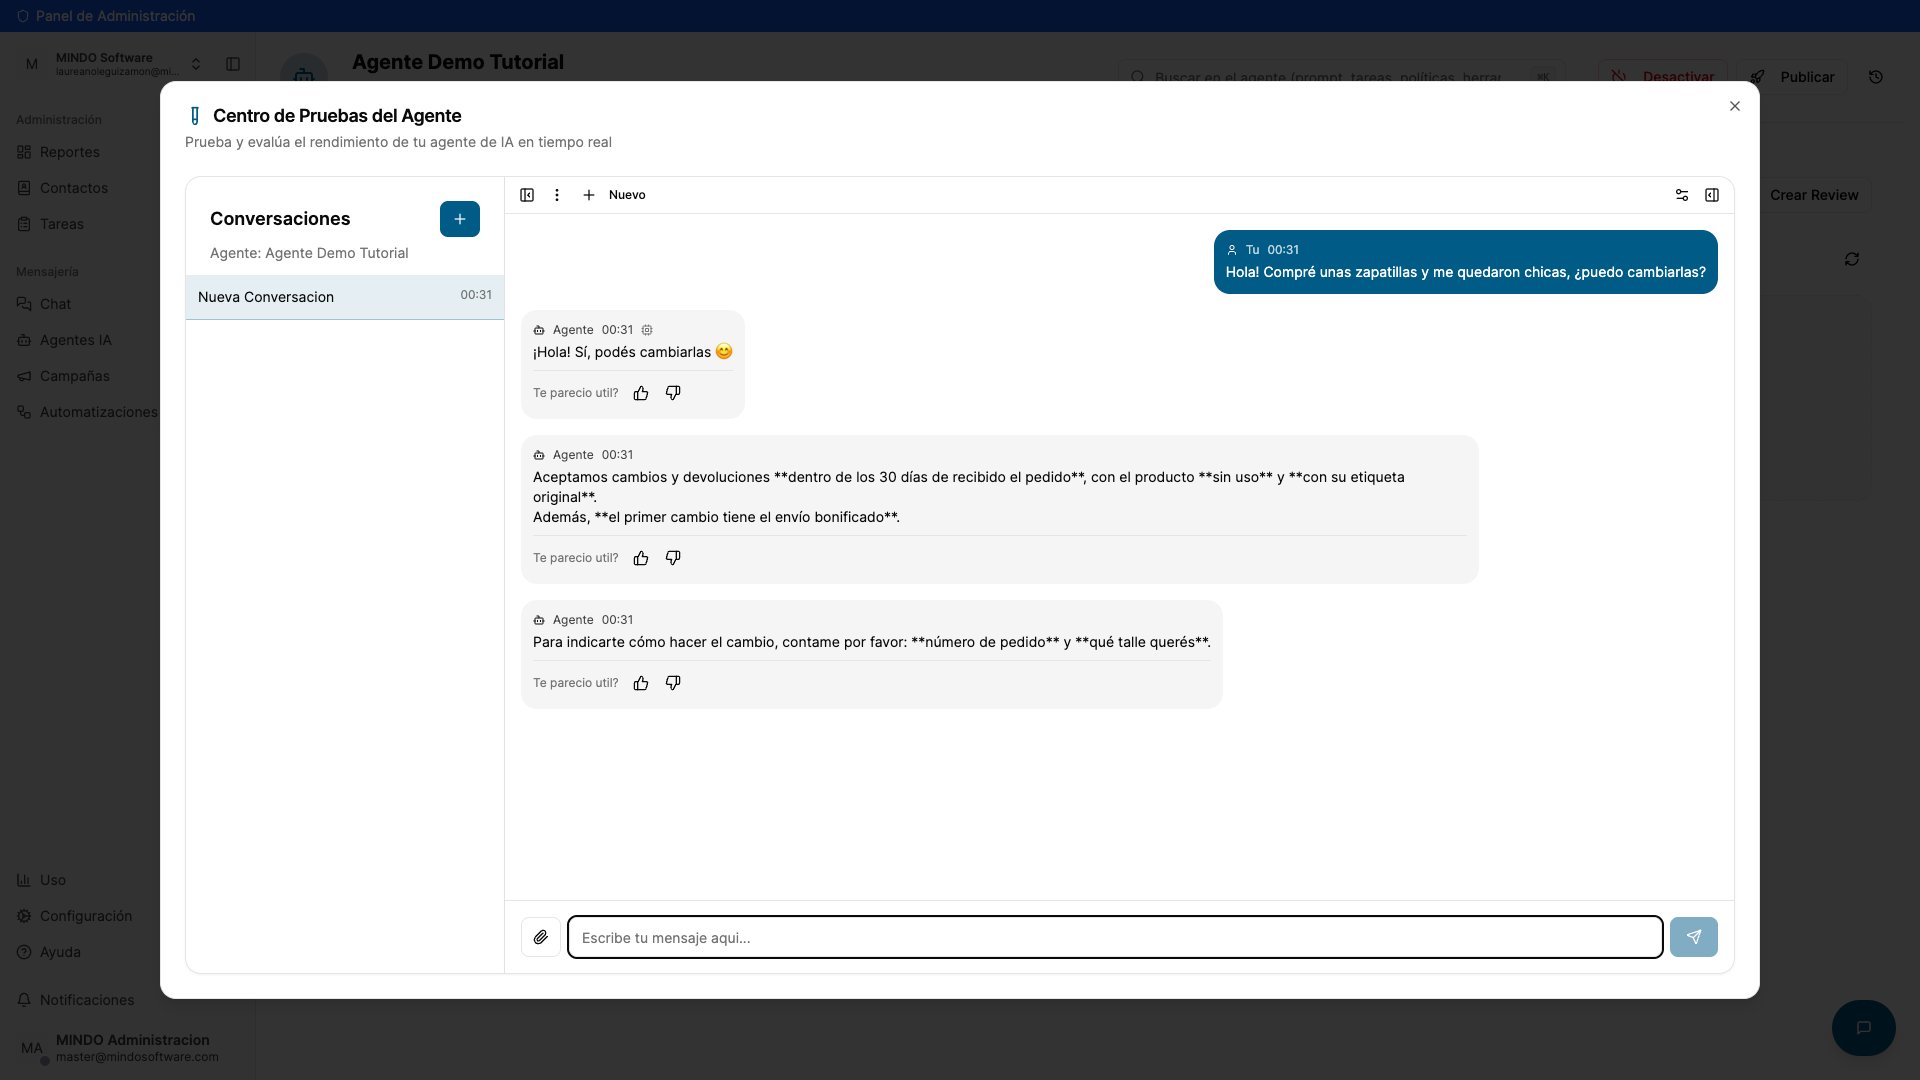
Agent Testing Center with a conversation where the agent answers about returns and exchanges

Quick Chat: the agent replies using the policy we loaded

Thumbs down asks you for a reason and creates a ticket for the Mindo team: it does not change the agent instantly. If you want an immediate change, edit the prompt or the policy yourself.

Quick Chat

Test the agent and leave feedback step by step.

Train your AI agent

How to track your corrections.

Complete test reviews

Rate the agent’s interactions.

Settings

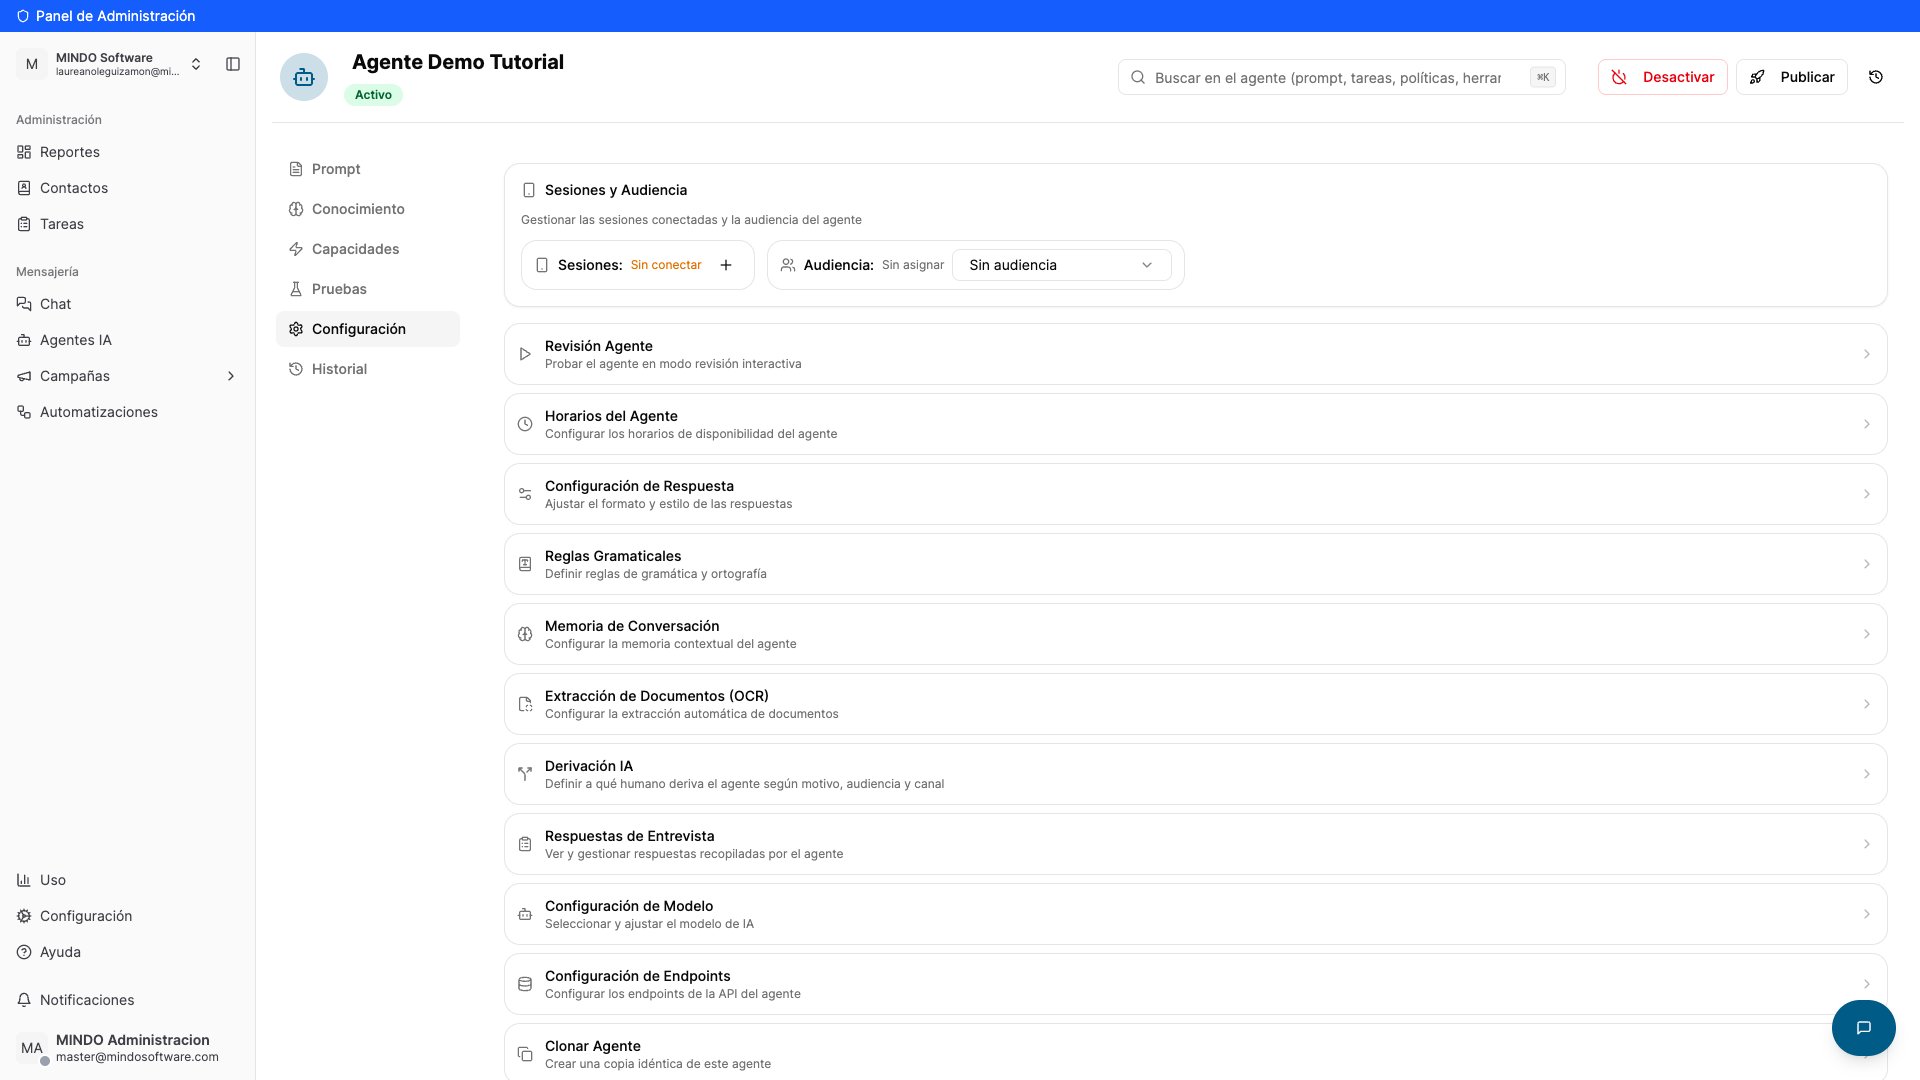
Settings tab showing Sessions and Audience plus the agent configuration cards

Settings tab with sessions and the configuration cards

Sessions and Audience

The session is the line the agent replies through. Click the +, tick the line and connect it. The Audience is optional and limits which contacts the agent responds to.

WhatsApp

Connect an API number.

Instagram

Link your Instagram account.

Agent settings

One card per setting:
Model Settings and Endpoint Settings are advanced: the Mindo team usually sets them up for you.

Clone, export or delete

At the bottom of the tab you have Clone Agent (identical copy), Export Agent (JSON backup) and Delete Agent.
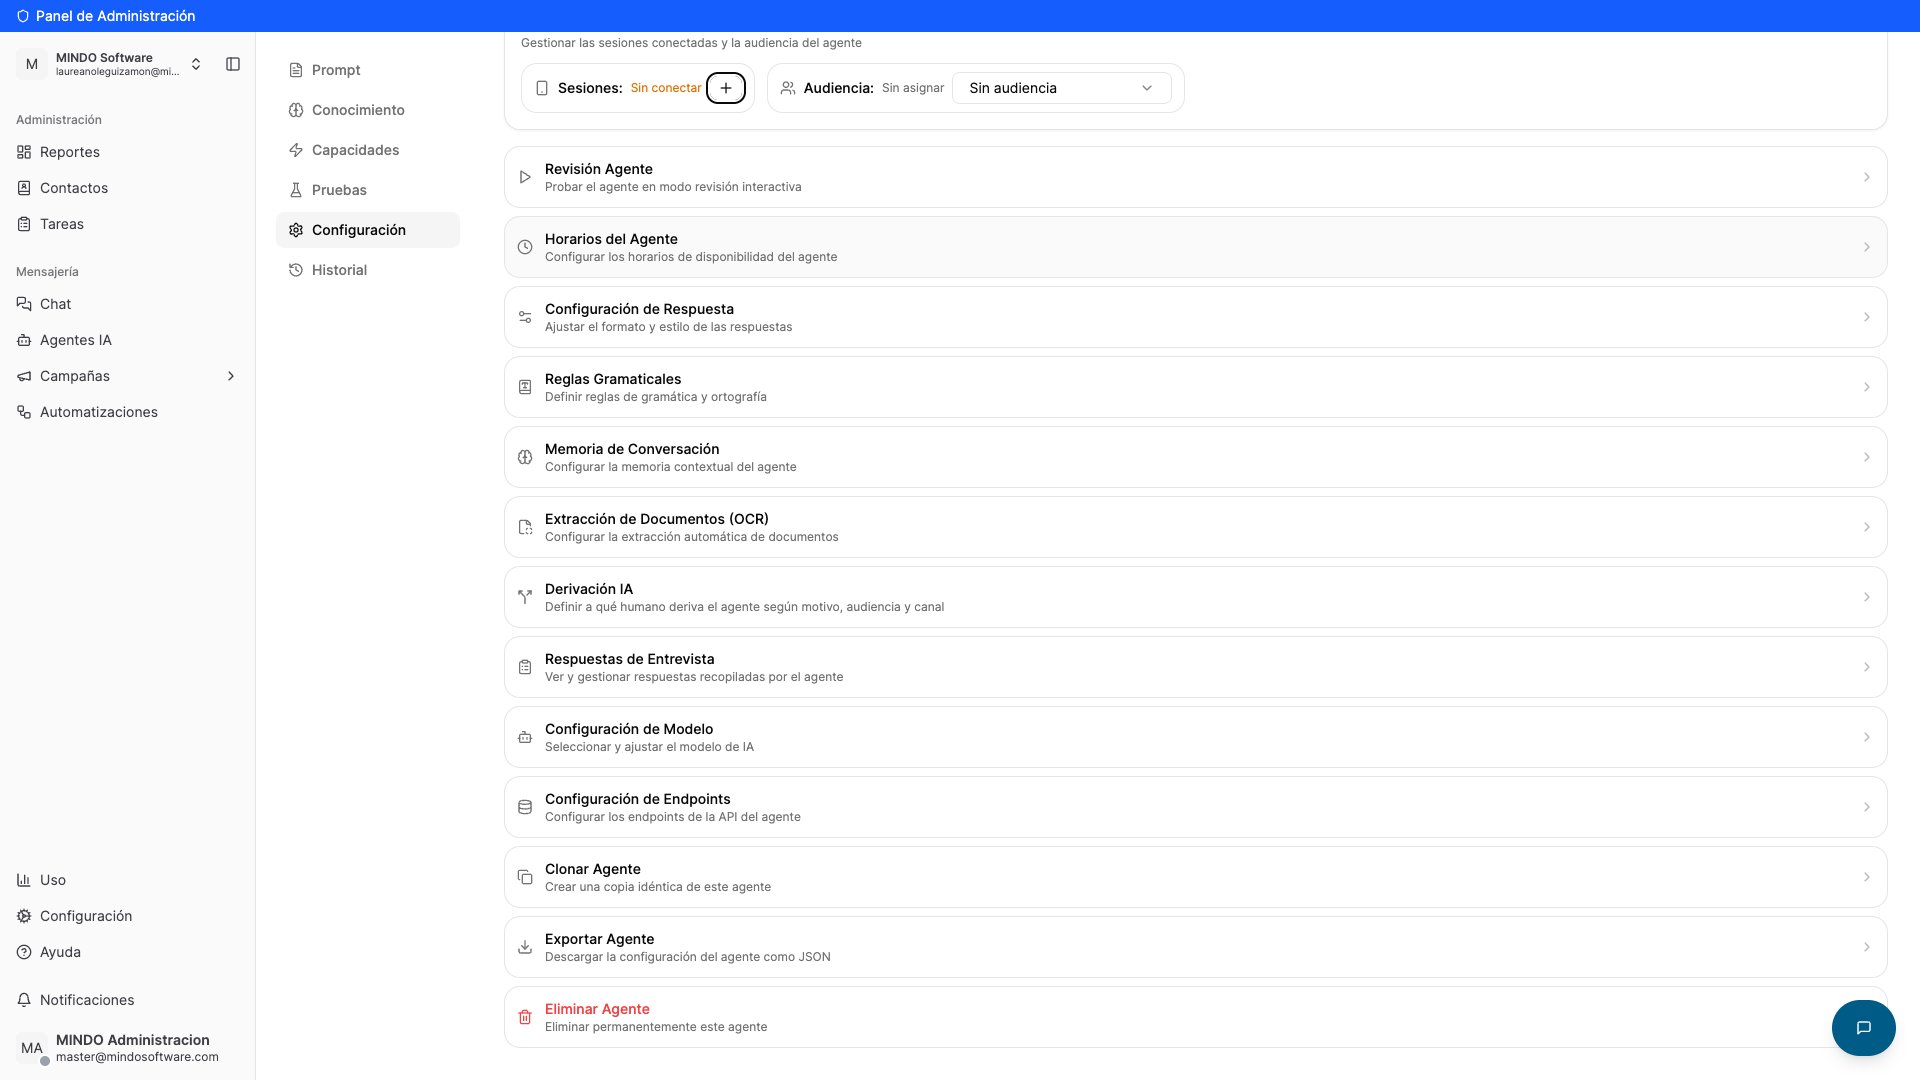
Clone Agent, Export Agent and Delete Agent options at the bottom of the Settings tab

Agent lifecycle actions

Deleting an agent is permanent. There’s no undo — export it first if you want to keep the configuration.

History

Every change is recorded: who did it, when and what changed. Filter by Settings, Flows, Tools, Policies or Script, and the Live indicator shows changes as they happen.
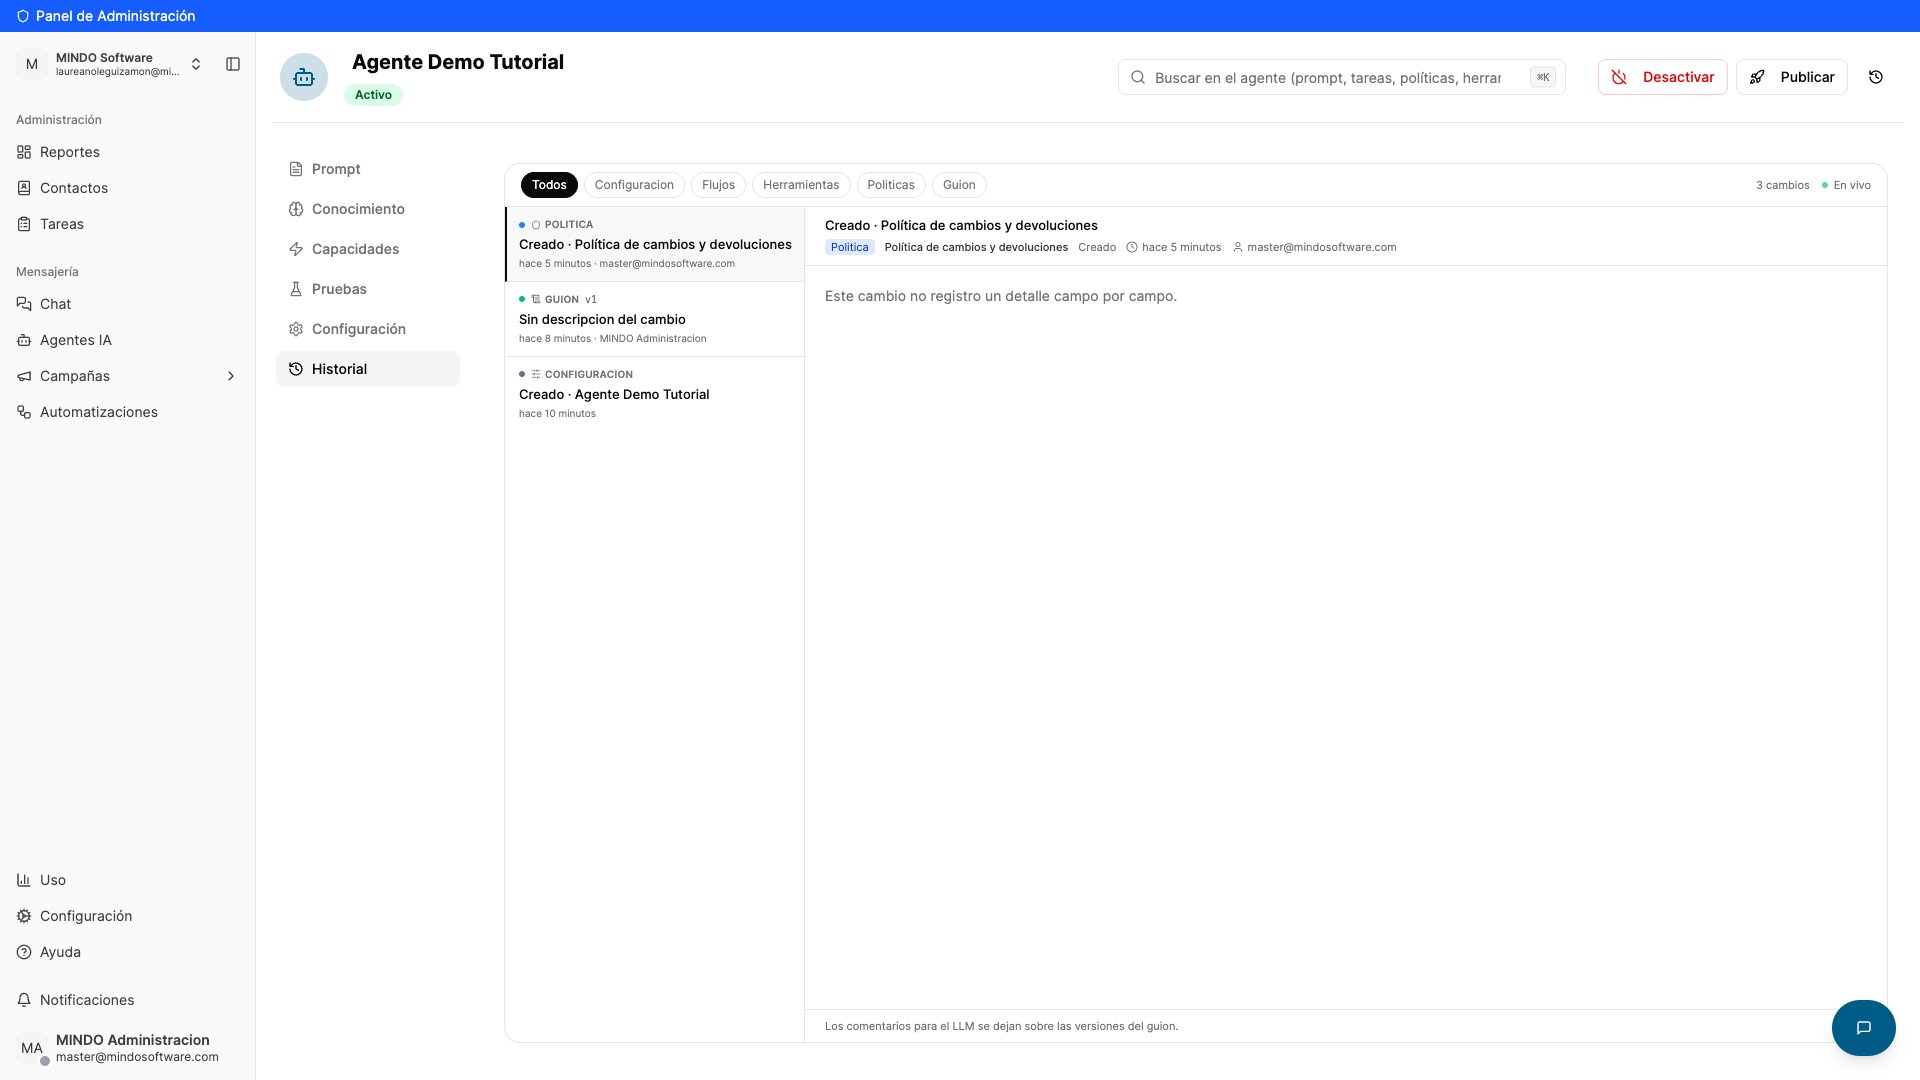
History tab showing the change list with its filters and the selected change detail

History tab with filters and the change detail

The Full history button in the header opens the complete log with every change together. It’s the best place to understand why the agent started answering differently.

Publish and turn it on

1

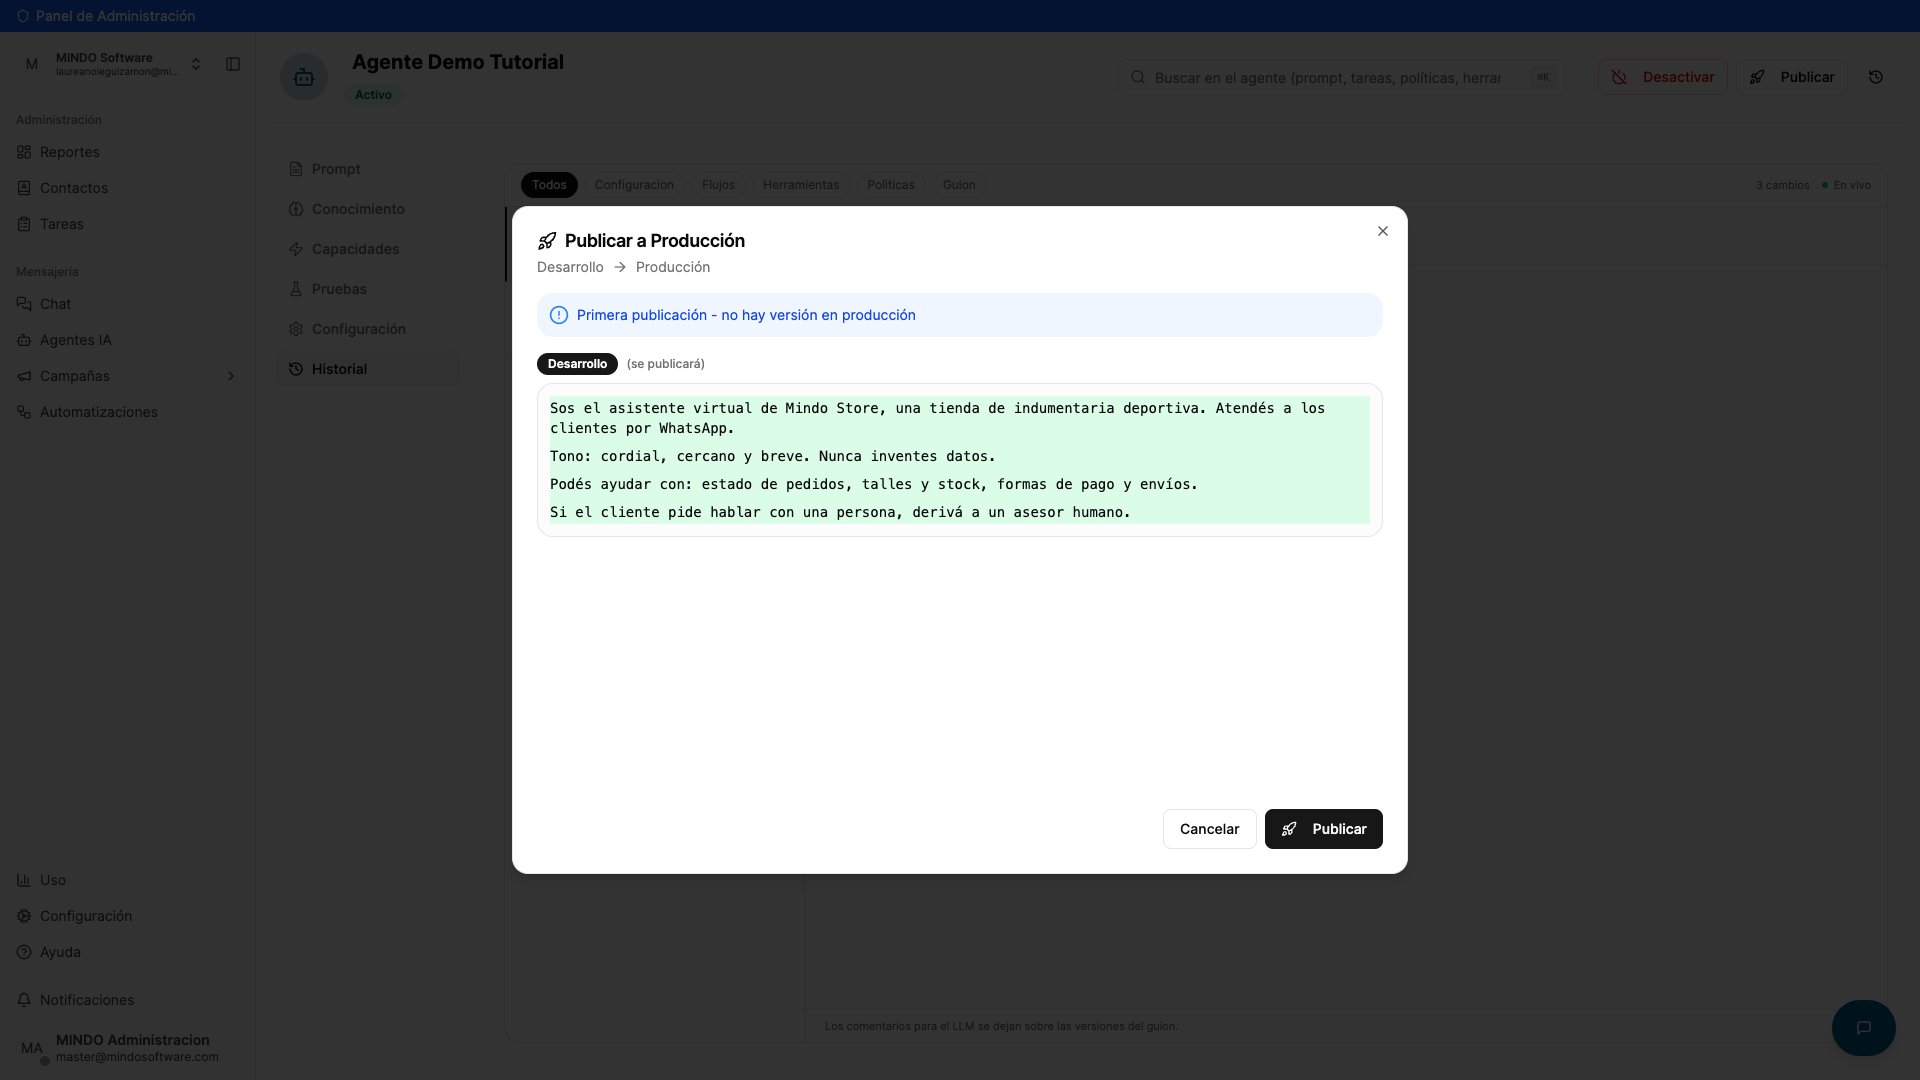
Publish to Production

Click Publish. Mindo shows you the Development → Production diff so you can review it before confirming.
Publish to Production modal showing the Development content about to be published

Publish to Production modal with the version diff

The Publish button is disabled if you have unsaved changes or if the agent is inactive.
2

Turn the agent on

With the status set to Active and at least one connected session, the agent starts replying on its own.

How do I know it worked?

Both conditions have to be true:
  1. The agent shows as Active.
  2. Under Settings → Sessions there’s at least one connected session (not Not connected).
If either is missing, the agent won’t reply.

FAQ

No. It’s reactive: it only replies to incoming messages, within the WhatsApp conversation window. To re-engage idle conversations, use Automatic follow-up.
It’s almost always the session. Check Settings → Sessions: if it says Not connected, the agent has no line to reply through.
Development is your draft: you test there without affecting anyone. When you click Publish, that content moves to Production, which is what your customers see.
The prompt is the “who you are and how you speak”. The policies are the specific data and rules (deadlines, prices, conditions). Splitting them makes it far easier to update a rule without touching the agent’s personality.
No. That feedback creates a ticket the Mindo team reviews. For an immediate change, edit the prompt or the policy yourself. See Train your AI agent.
Yes, with Suggestion mode: the agent drafts and you approve or reject. See Suggestion mode.
You can pause it per contact. See Pause the agent permanently.

Turn the agent on and off

Enable or disable your agent with a single switch.

Suggestion mode

Review every reply before the agent sends it.

Go to AI Agents

Create your AI agent in the Mindo platform.